Installation Guide (on-prem)
Audience:
System/Security AdministratorsSkill Prerequisites:
System Administration and Maintenance
Installation Guide (on-prem)
This page will provide you with a complete technical walkthrough of the installation process for the self-hosted/on-prem version of Plant an App.
If you are using our SaaS offering, you do not need to go through this guide, as everything is hosted and preconfigured on our portal. You can skip directly to the subsequent "Plant an App User Guide" page.
System Requirements
General Requirements
| Requirement | Description |
|---|---|
| Internet access | Required to initially download all product components and to retrieve product updates. |
| Access to our CDN | Necessary to whitelist specific domains and enable TLS Ciphers. Details can be found in the Getting Started / IP Whitelist topic. |
Software Requirements
| Required software | Version/Notes |
|---|---|
| Windows | |
| .NET Framework | 4.7.2 or higher |
| SQL Server | 2014 or higher Note: in order to improve performance under higher loads, the use of Web Edition/Standard/Enterprise editions of SQL Server are recommended, as the Express edition is limited in terms of maximum resource usage. |
We always recommend using the latest available software versions - Windows Server 2022, SQL Server 2019, .NET Framework 4.8, etc.
Minimum Hardware Requirements
Note these are minimum requirements that will allow you to run the Plant an App platform. The requirement thresholds are highly project-dependent and will thus vary.
| Hardware | Notes/Details |
|---|---|
| 2CPU's * | Or 2 vCPUs for VMs. * Take into account the note below. |
| 4GB RAM * | * Take into account the note below. |
| 5GB storage space | This is the bare minimum space required to run the application; you should increase this value if the implementation creates files on disk and/or if the performance degrades at higher loads. |
Note: Best Practice for the Production Environment
When deploying on the production environment systems, we recommend the usage of two separate servers:
- the first for storing the application files
- the second for hosting the SQL Database Server
This allows for better segregation and control of the physical resource usage. As such, we recommend using at least 2CPU's and 4GB RAM for each server.
Installation Procedure
There are two main ways to install Plant an App:
Deploying it on a Windows Server with "Web Server (IIS)"
or
Installing it as a Docker container (recommended).
A third possibility consists of simply deploying the Plant an App "AppBuilder" on an existing DNN instance. This scenario is covered as part of the "Windows Server" installation option and is detailed in the "Plant an App deployment" section, below.
Installation on Windows Server (standard)
This is a two step process. It involves:
DNN installation
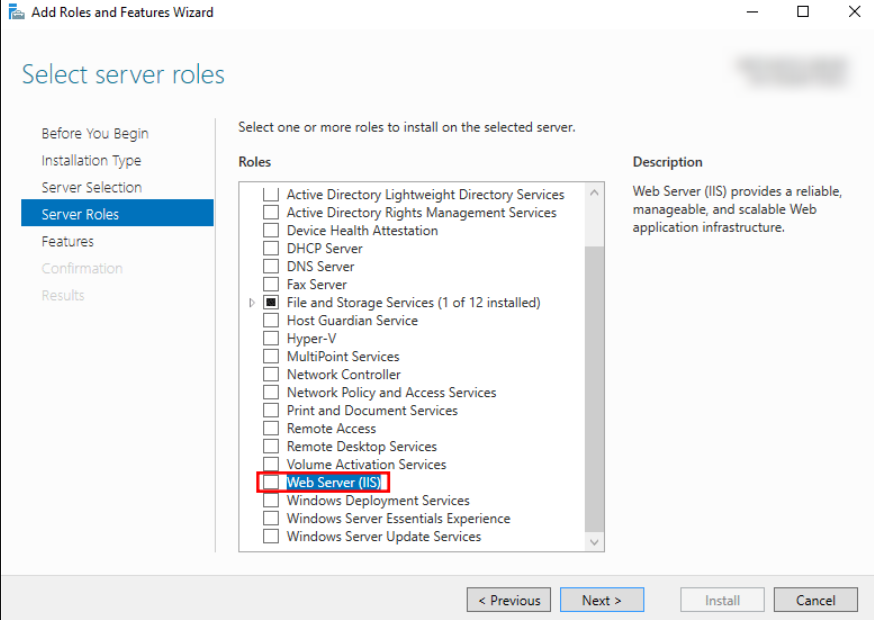
- Make sure that the “Web Server (IIS)” role (or “World Wide Web Services”) is installed; if it is not, please install it from the Windows Server Manager.
For non-Server versions of Windows, please follow this guide.
Also under “Web Server (IIS)”, please make sure you install the following roles and features:
- Web Server
- Common HTTP Features:
- Default Document
- Directory Browsing
- HTTP Errors
- Static Content
- Health and Diagnostics:
- HTTP Logging
- Performance:
- Static Content Compression
- Security:
- Request Filtering
- Application Development:
- .NET Extensibility 3.5
- .NET Extensibility 4.7
- Application Initialization
- ASP.NET 3.5
- ASP.NET 4.7
- ISAPI Extensions
- ISAPI Filters
- Common HTTP Features:
- Management Tools
- IIS Management Console (optional, if you want to access your IIS Plant an App site's management locally)
For clarity, here is an overview of the required roles and features:
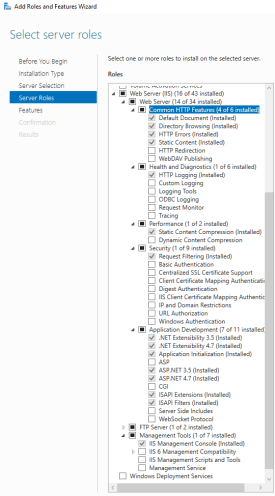
The FTP Server role is not mandatory to run Plant an App, but recommended.
Get the installer package from:
https://github.com/dnnsoftware/Dnn.Platform/releasesDownload the "
DNN_Platform_<version>_Install.zip" installer archive that corresponds to the Plant an App version you want to deploy (please see our Plant an App-to-DNN Version Compatibility Matrix). As a general rule, it is recommended to always download the latest available version of DNN.Unpack the archive in a folder on the file host server.
Follow this guide to create a site in IIS. At step 5 of the process, make sure that you target the folder where you unzipped the installation archive (previous point). Also make sure you target the
web.configfile from that folder.Create a new database on the SQL Server (the name is irrelevant).
On the new database, create a SQL login user with
db_ownermembership. See Defining the SQL User for DNN + Plant an App for detailed instructions and requirements.Open the site's
web.configfile and look for the "SiteSqlServer" key in the "<connectionStrings>" section; set its value to:"Data Source=<IP address of the SQL server>;Initial Catalog=<database name>;User ID=<database login username>;Password=<database password>"Open a web browser and access your site by typing "
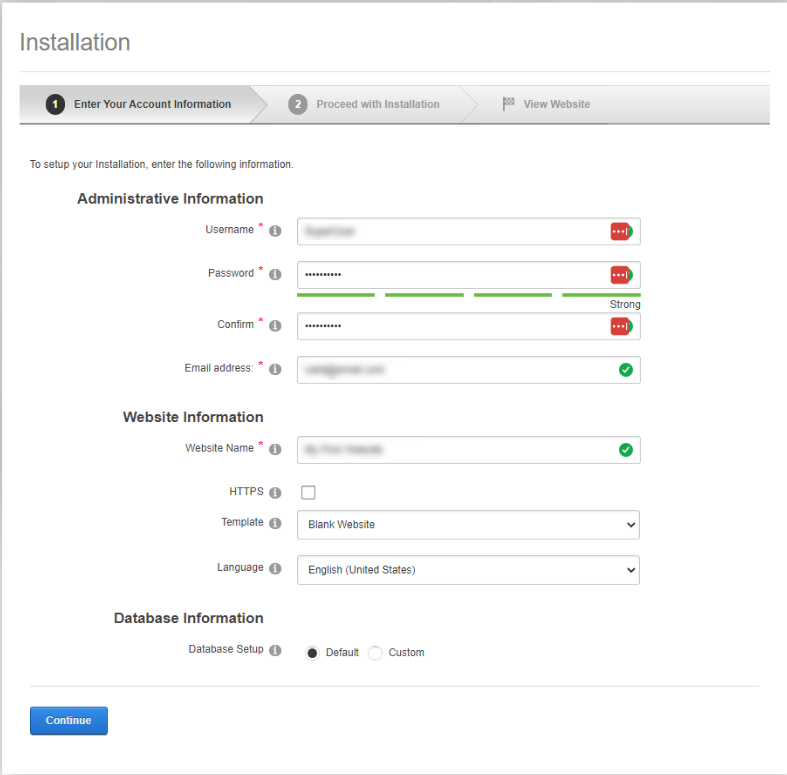
http://<localhost>" (or its<IP address>,<IP address>, or<DNS>, depending on how you configured it) in the address bar and run the DNN Install.
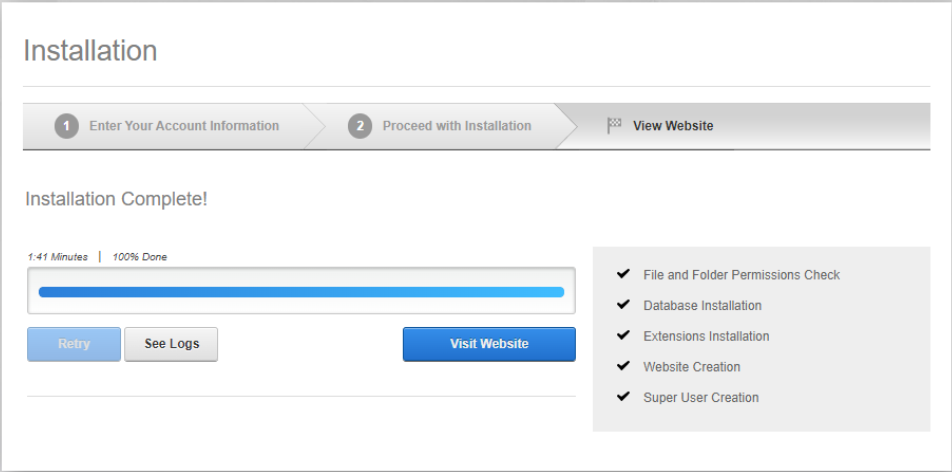
Click on Visit Website when the installation is complete.
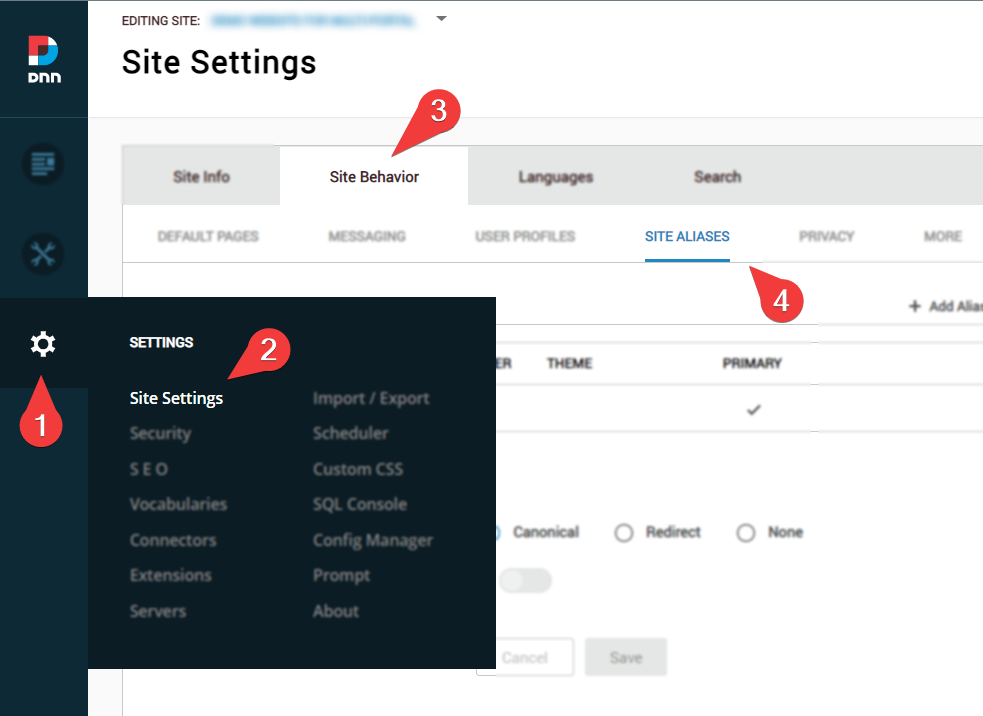
- Optionally, you can setup additional portal aliases (URLs for the DNN site) from:
Persona Bar>Site Settings>Site Behavior>Site Aliases
Plant an App deployment
This section details the Plant an App deployment process on a DNN Platform installation. If you do not have DNN platform installed, please go through the guide above to install it first.
Download latest App Builder module version from the following URL:
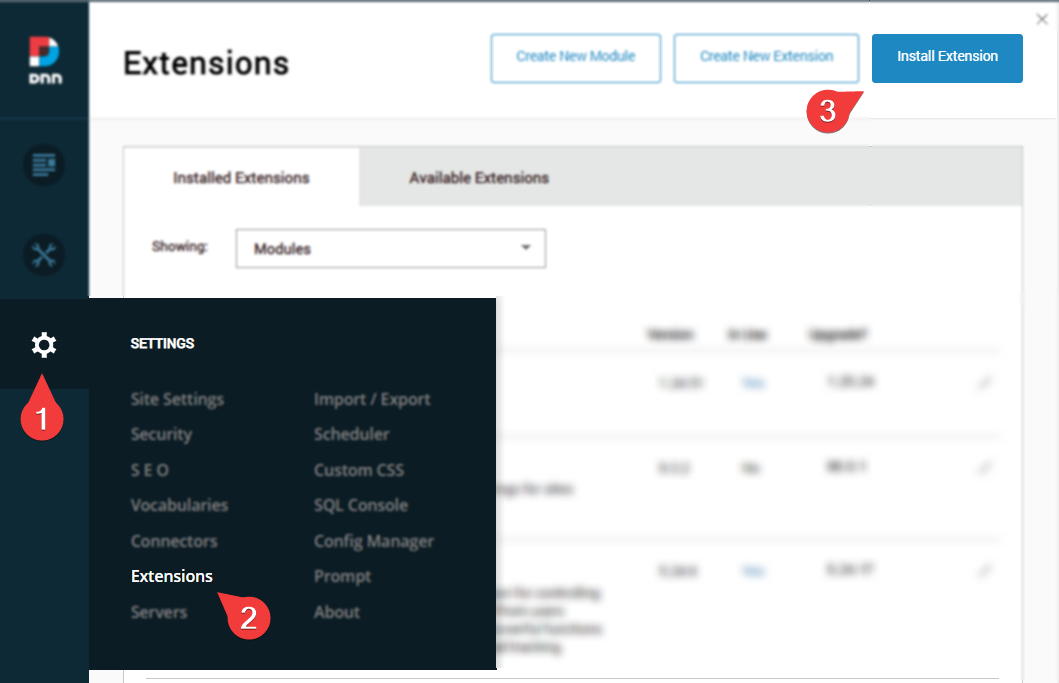
https://console.plantanapp.com/DownloadsOpen your DNN Platform site URL in a web browser and go to Persona Bar > Host Settings > Extensions > Install Extension.
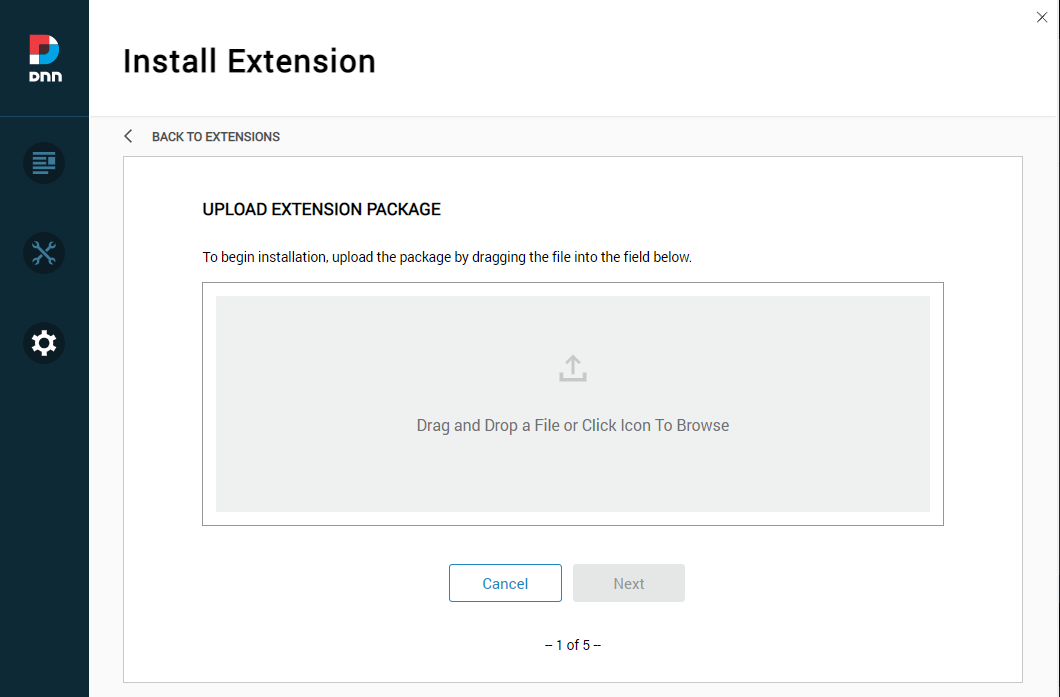
- Add or drag-and-drop the AppBuilder .zip archive to install it.
- Once the App Builder module is installed, create a new page.
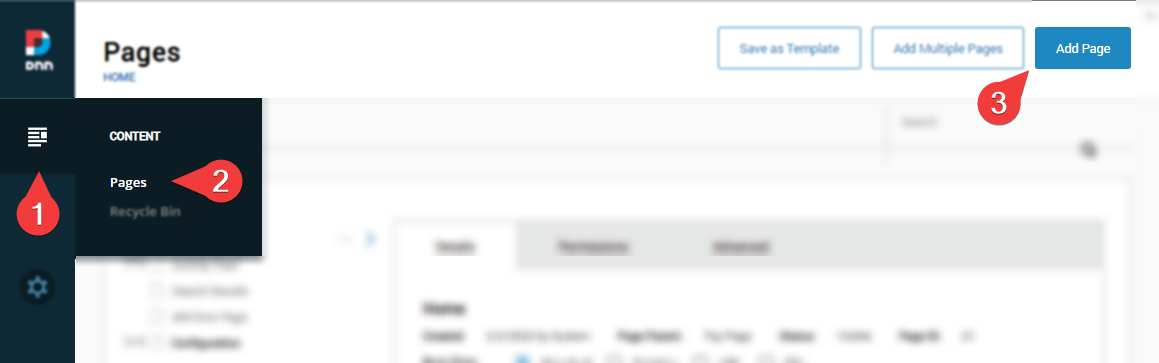
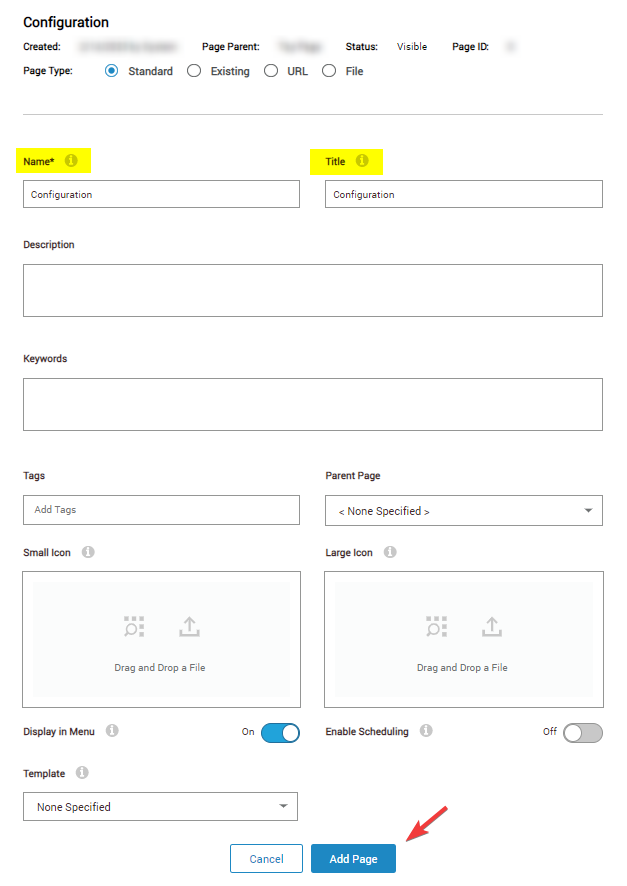
- Enter a Name and a Title (e.g. “
Configuration”) for the page (mandatory); you can also add a Description, Tags, Icons, etc. (optional). When you are done, click ‘Add Page’ at the bottom of the screen.
- Put the page in "Edit" mode by clicking on the ✎ (pencil icon) in the bottom left side of the screen, and then on the "Add Module" button.
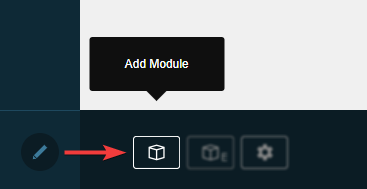
- Add the "App Builder" module on the newly created page, by clicking on the left 3D shaped box. It will open a popup letting you choose what module to add on the page.
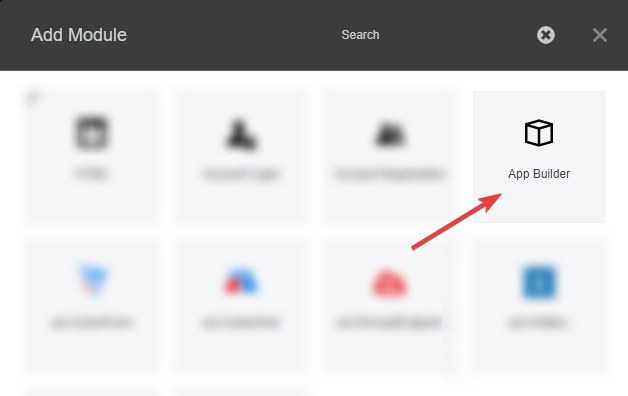
Choose "App Builder" and drag it on the page.
- Once the App Builder module is installed, the activation screen will show-up.
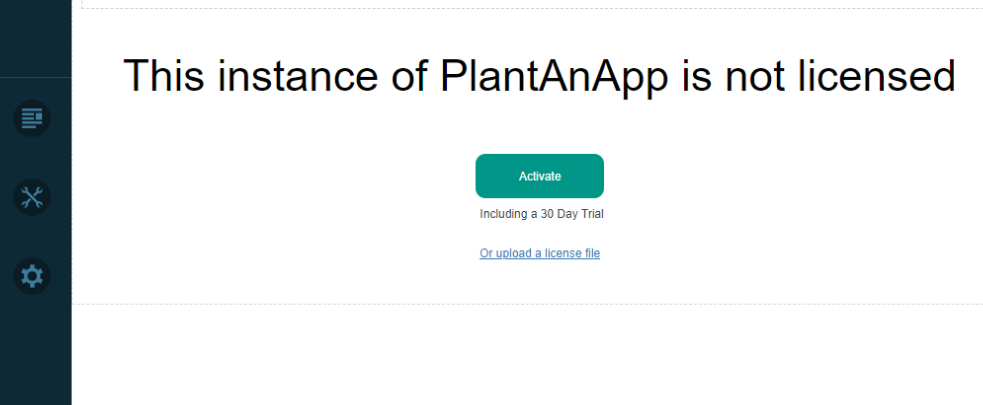
Clicking the "Activate" button will redirect you to https://console.plantanapp.com where you can choose your organization and subscription.
Installation with Docker Containers (recommended)
This installation will allow you to run Plant an App in a containerized Docker environment. As such, the first step is install the Docker engine.
Docker installation
- Operating system requirement - Windows 10 Pro 21H2 update, Windows 11, Windows Server 2019 or 2022.
- Windows preparation - install the "
Containers" and "Hyper-V" features as detailed here. - Docker installation - according to your operating system:
- For Windows 10/11, download and install Docker from their official site.
- For Windows Server 2019/2022, follow the official guide from Microsoft.
Plant an App installation on Docker
When deploying Plant an App on Docker, you have the choice of either using a containerized SQL Express database (default) or using your own dedicated SQL database server.
Fully contenerized deployment (with "SQL Express" database containers)
Clone the following repository on your local computer or server:
https://github.com/plantanapp/tryplantanapp-dockerGo to the folder where you cloned the repository and open the
.envfile with a text editor. Find the "windows_version" variable and change it as follows, according to your operating system:- For Windows 10 21H2 update, to:
windows_version=21h2. - For Windows Server 2019, to:
windows_version=2019 - For Windows Server 2022 or Windows 11, to:
windows_version=2022
- For Windows 10 21H2 update, to:
In the same folder, open a PowerShell console with admin privileges and run the following command:
\RunPlantanapp.ps1 -Start .
This will automatically create the required folders required and start the containers. Wait for the download and build of the containers to complete.
Using the .\RunPlantanapp.ps1 command alone will show you a help text of all the available parameters, as well as usage examples.
- Open a web browser and access your new app by typing "
localhost", its<IP address>, or<DNS>in the address bar - depending on where you deployed it.
Deployment of the App alone (with separate SQL Server)
Clone the following repository on your local computer or server:
https://github.com/plantanapp/tryplantanapp-dockerGo to the folder where you cloned the repository and open the
.envfile with a text editor. Find the "windows_version" variable and change it as follows, according to your operating system:- For Windows 10 21H2 update, to:
windows_version=21h2. - For Windows Server 2019, to:
windows_version=2019 - For Windows Server 2022 or Windows 11, to:
windows_version=2022
- For Windows 10 21H2 update, to:
In the same
.envfile, change the "sa_password" and "base_connection" variables to correspond to your own SQL database parameters.Open the
docker-compose.ymlfile and:
Delete or comment the entire 'mssql' service section:
mssql:
  image: public.ecr.aws/n0h9y3l0/tryplantanapp-sql2017:win${windows_version}-${pa_version}
  isolation: 'process'
  volumes:
    - "${db_folder_path}:C:/dbFiles/"
  ports:
    - '${sql_port}:1433'
  environment:
    ACCEPT_EULA: 'Y'
    sa_password: ${sa_password}
    attach_dbs: ${attach_dbs}
  networks:
    - appnet
In the 'web' service section, delete or comment the following two lines:
depends_on:
  - mssql
In the same folder, open a PowerShell console with admin privileges and run the following command:
\RunPlantanapp.ps1 -Start .
This will automatically create the required folders required and start the containers. Wait for the download and build of the containers to complete.
Using the .\RunPlantanapp.ps1 command alone will show you a help text of all the available parameters, as well as usage examples.
- Open a web browser and access your new app by typing "
http://<localhost>" (or its<IP address>or<DNS>, depending on how you deployed it) in the address bar.
Back to the top ⤴