Open ID Connector
Audience:
System Administrator,Citizen DeveloperSkill Prerequisites:
Authentication,Portal Configuration
The Open ID Connector lets users sign in to your site with an external identity provider (IdP), such as Microsoft Entra ID (Azure AD), Okta, Google or any other provider that supports OpenID Connect or OAuth 2.0. It adds a Login with ... button for each provider to the login and registration pages, or sends users straight to one provider. On first sign-in it creates the user's account or links it to an existing one.
Typical Use Cases
- Single sign-on (SSO) with your organization's identity provider, so users sign in with their work account.
- Use the identity provider's multi-factor and conditional access rules for your site.
- Send everyone straight to the identity provider instead of showing the site's own login form.
- Offer several providers side by side, for example employees through Entra ID and partners through Okta.
- Run actions on every sign-in, for example to sync roles or profile fields from the provider's claims.
Open the settings
In the Persona Bar, go to Manage > DnnSharp OpenIdConnect.
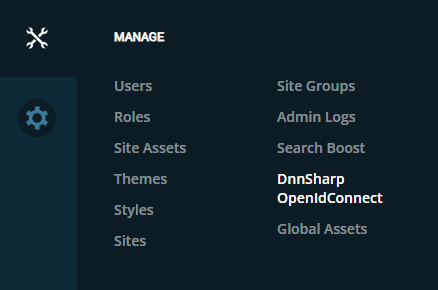
The settings screen has four sections:
- General settings: turn the connector on and choose how the login page behaves.
- Providers: one block per identity provider. Click a provider's name to show or hide its settings.
- Advanced Settings: HTTP exceptions for testing.
- Hints: the exact Login URI and Logout URI to register with your identity provider.
Set up a provider
- Save the general settings first. Turn on Enable Authentication and click Save at the top of the screen. You can't add providers until the general settings are saved.
- Copy the redirect URIs. In the Hints section, copy the Login URI (
https://your-site/login) and the Logout URI (https://your-site?ctl=logoff). They're generated in lower case. - Register an application with your identity provider. Create a web application that uses the authorization code flow, and set:
- Redirect (sign-in) URI: the Login URI.
- Post-logout (sign-out) redirect URI: the Logout URI.
- Note the Client ID, create a Client Secret, and note the provider's Issuer URL.
- Add the provider. Click Add Provider and fill in at least:
- Enable provider: on.
- Provider Type:
OpenId Connectfor almost all providers. - Provider Name: shown on the button, as in Login with Contoso.
- Issuer, Client Id and Client Secret.
- Authentication Method: how your provider expects the client credentials.
Client Secret Basicworks for most providers.
- Decide how existing users are matched. See Matching existing users. If your site already has users with the same email addresses, turn on Auto Match Existing Users or add On Match Existing User Actions. Otherwise those users get an error.
- Click Save Provider. Each provider is saved on its own, separately from the general settings.
- Test. Open the login page in a private browser window and sign in with the new button.
- Optional: when sign-in works, choose the provider in Auto Redirect to skip the login page entirely.
Some providers compare redirect URIs exactly. https://your-site/?ctl=logoff and https://your-site?ctl=logoff count as different URIs, as do different capitalizations. Copy the URIs from the Hints section exactly. If you test on HTTP (for example localhost), turn on Callback URIs Insecure first so the hints and the URIs sent to the provider use http://.
Microsoft Entra ID (Azure AD)
- In the Microsoft Entra admin center, go to App registrations > New registration. Choose Single tenant and add the Login URI as a Web redirect URI.
- Under Authentication, add the Logout URI as the Front-channel logout URL too.
- Under Certificates & secrets, create a client secret and copy its Value, not its ID.
- Under Token configuration, add the optional ID token claims
email,given_nameandfamily_name. The connector requires all three, and users also need an email address in Entra ID. - In the provider settings, use:
- Issuer:
https://login.microsoftonline.com/<tenant-id>/v2.0, with your directory (tenant) ID. - Client Id: the application (client) ID.
- Client Secret: the secret value.
- Authentication Method:
Client Secret BasicorClient Secret Post. Both work.
- Issuer:
- Leave Validate Access Token off. Without a custom API scope, Entra ID issues access tokens for Microsoft Graph, and other applications can't validate those.
Don't use the common or organizations endpoint as the Issuer. The Issuer must be identical to the iss claim in the tokens, which always contains a specific tenant ID.
Okta
- In the Okta Admin Console, go to Applications > Create App Integration, choose OIDC - OpenID Connect and Web Application.
- Set Sign-in redirect URIs to the Login URI and Sign-out redirect URIs to the Logout URI. Under Assignments, choose who can use the app.
- Copy the Client ID and Client secret.
- In the provider settings, use:
- Issuer:
https://<your-okta-domain>/oauth2/defaultfor the default custom authorization server, orhttps://<your-okta-domain>for the org authorization server. Use the issuer your tokens actually contain. - Client Id and Client Secret from the app.
- Authentication Method:
Client Secret Basic, which is the Okta default.
- Issuer:
- Keep Send Id Token Hint on. Okta requires
id_token_hintto sign users out.
Settings Reference
General settings
| Setting | Description | Default |
|---|---|---|
| Enable Authentication | Turns the connector on for the current site. When it's off, no provider buttons appear and nobody can sign in through a provider. | Off |
| Auto Redirect | Choose a provider to skip the login page: users who open the login page are sent straight to that provider. Leave it at -- to show the login page with one button per enabled provider. | -- |
| Hide DNN login form | Hides the site's username and password form and shows only the provider buttons. Only shown when Auto Redirect is --. | Off |
| Custom CSS | CSS for the provider buttons, scoped to the .dnnSocialRegistration class. Each button also has the class prov plus the provider's ID, for example .prov3. Prefilled with default styles. Only shown when Auto Redirect is --. | Default styles |
With Auto Redirect set, the site's own login form is never shown, so local accounts, including administrators, can't sign in there. Test the provider thoroughly before you turn it on, and make sure at least one administrator can sign in through the provider.
Provider settings
Provider general settings
| Setting | Description | Default |
|---|---|---|
| Enable provider | Shows this provider's button on the login page. A disabled provider can't be used to sign in. | Off |
| Auto Match Existing Users | When a user signs in for the first time, links them to an existing account with the same email address. See Matching existing users. | Off |
| On Match Existing User Actions | Actions that run when a user signs in for the first time and Auto Match Existing Users is off. Use them to find the account to link. See Matching existing users. Only shown when Auto Match Existing Users is off. | None |
| Provider Type | OpenId Connect or OAuth 2. Use OAuth 2 only for providers that don't support OpenID Connect. They then need a Token Endpoint, a User Endpoint and a claim mapping. | OpenId Connect |
| Provider Name | Shown on the buttons: Login with name on the login page and Register with name on the registration page. Must be unique. Required unless Auto Redirect is set, and hidden when it is. | New Provider |
| Issuer | The provider's issuer URL, for example https://login.example.com. It must be identical to the iss claim in the provider's tokens, including any trailing slash. The connector loads the provider's configuration from the discovery document under this URL (/.well-known/openid-configuration). | Empty |
| WellKnown Endpoint | The full URL of the provider's discovery document, if it isn't at the standard location under the Issuer. | Empty |
| Scopes | Extra scopes to request, separated by spaces, for example phone address. For OpenID Connect providers, openid profile email is always added. For OAuth 2 providers, nothing is added. | Empty |
| Client Id | The client (application) ID from the provider. | Empty |
| Client Secret | The client secret from the provider. | Empty |
| Authentication Method | How the Client Id and Client Secret are sent to the token endpoint. Client Secret Basic sends them in the HTTP Authorization header. Client Secret Post sends them in the request body. Must match the provider's configuration. | Client Secret Basic |
| URL-encode Credentials | URL-encodes the Client Id and Client Secret before they're put in the Authorization header, as the OAuth 2.0 specification requires. Many providers don't expect this, so turn it on only if your provider needs it, for example when the secret contains special characters and sign-in fails with an invalid client error. Only shown for Client Secret Basic. | Off |
| Token Endpoint | Overrides the token endpoint from the discovery document. Required for OAuth 2 providers. | Empty |
| User Endpoint | Overrides the user info endpoint from the discovery document. Required for OAuth 2 providers. | Empty |
| Claim Mapping | The names your provider uses for the four claims the connector needs: Sub (unique user ID), Email, Given Name and Family Name. Leave empty if the provider uses the standard names (sub, email, given_name, family_name). All four are required for OAuth 2 providers. | Empty |
| On Authorized Actions | Actions that run every time a user signs in with this provider. See Tokens in actions. | None |
Token validation
| Setting | Description | Default |
|---|---|---|
| Validate Access Token | Also validates the access token against the provider's signing keys, issuer, audience and lifetime. The ID token is always validated. Turn it on only when the access token is a JWT meant for this application. | Off |
| Access Token aud Claim Name | The name of the audience claim in the access token, for providers that don't use aud. Only shown when Validate Access Token is on. | aud |
Logout settings
| Setting | Description | Default |
|---|---|---|
| Local logout only | Signs users out of the site only. They stay signed in at the provider, so the next sign-in may happen without a password. Hidden when Logout user locally first is on. | Off |
| Logout user locally first | Signs users out of the site first, then redirects them to the provider's logout page. When it's off, users are sent to the provider first, and the provider sends them back to the Logout URI to finish signing out of the site. Hidden when Local logout only is on. | Off |
| Send Id Token Hint | Adds the id_token_hint parameter to the provider's logout URL. Most providers need it to sign out without asking. | On |
| Send Client Id | Adds the client_id parameter to the provider's logout URL. | Off |
| Logout URI | The provider's logout URL. Leave empty to use end_session_endpoint from the discovery document. If neither exists, users are only signed out of the site. | Empty |
| Logout URI parameters mapping | Renames the logout query parameters for providers that don't use the standard names: id_token_hint, client_id and post_logout_redirect_uri. Leave empty to use the standard names. | Standard names |
| Mobile Login Client Id | Overrides the Client Id when validating ID tokens sent to the mobile login API. Leave empty to use the Client Id. | Empty |
Providers can't be deleted. To stop using one, turn off Enable provider.
Advanced settings
| Setting | Description | Default |
|---|---|---|
| Mobile Login Insecure | Allows the mobile login API over HTTP. Only for testing. | Off |
| Callback URIs Insecure | Generates the Login and Logout URIs with http:// instead of https://. Only for testing, for example on localhost. | Off |
How sign-in works
- The user clicks Login with provider, or is sent to the provider automatically by Auto Redirect.
- The user is redirected to the provider's authorization endpoint (authorization code flow) and signs in there.
- The provider redirects back to the Login URI with a code. The connector exchanges the code for tokens at the token endpoint.
- For OpenID Connect providers, the ID token is validated: signature against the provider's published keys, issuer, audience (the Client Id) and lifetime, with two minutes of clock tolerance. The access token is validated too if Validate Access Token is on.
- The connector calls the user info endpoint and merges its claims with the ID token's claims, applying any claim mapping. The result must contain
sub,email,given_nameandfamily_name. For OpenID Connect providers, thesubfrom the user info endpoint must match the one in the ID token. - The connector finds or creates the site user. See Matching existing users.
- On Authorized Actions run, and the user is signed in.
If the provider returns an error, for example because the user declined consent, the login page shows the error and its description.
Matching existing users
The connector links each site user to the provider's sub claim, the user's unique ID at the provider. A user who signs in again is recognized by that link, even if their email address changes.
When a user signs in with a provider for the first time and no site user is linked yet:
| Auto Match Existing Users | On Match Existing User Actions | What happens |
|---|---|---|
| On | Not used | If a site user has the same email address, they're linked and signed in. Otherwise a new user is created. |
| Off | Configured | The actions run. If they load a user, for example with Load User, that user is linked and signed in, and their email address is updated to the one from the provider. If they return an error, for example with Display Error Message, sign-in stops and the user sees the message. If they load no user, a new user is created. |
| Off | None | If a site user has the same email address, sign-in stops with A user with the same email address was already created by a different authentication provider. Otherwise a new user is created. |
When an existing user is linked, their username is changed to the connector's format, DnnSharpOpenIdConnect-<sub>. Users who also sign in with a username and password need to know their new username, or sign in with their email address instead.
New users are created:
- approved, with a random password, so they sign in through the provider;
- with the username
DnnSharpOpenIdConnect-<sub>, or their email address if the site uses email addresses as usernames; - with the first name, last name, email address and display name from the provider's claims.
Auto matching trusts the email address the provider sends. Turn it on only for providers that verify email addresses and that you trust, such as your organization's own directory. Otherwise someone could create an account at the provider with another user's email address and take over that user's account.
Tokens in actions
In On Authorized Actions and On Match Existing User Actions, these tokens are available:
| Token | Contains |
|---|---|
[Claims:<claim>] | The value of one claim, for example [Claims:email] or [Claims:given_name]. A claim with several values, such as groups or roles, contains a JSON array. Both the original and the mapped claim names are available. |
[Claims] | All claims as a JSON object of name and value pairs. |
[OriginalClaims] | The raw response from the user info endpoint, as JSON. |
In On Authorized Actions, the signed-in user is the current user, so user tokens such as [User:Email] and actions such as Grant User Role work on that user. In On Match Existing User Actions, there's no current user until an action loads one.
For example, to give everyone in a provider group a site role, add Grant User Role to On Authorized Actions with a condition that checks whether [Claims:groups] contains the group's ID.
Bind External User To Dnn action
The Bind External User To Dnn action, in the OpenId Connect group, creates a site user that's already linked to a provider user. Use it to create accounts in advance, before users sign in for the first time. It doesn't sign anyone in.
| Parameter | Description |
|---|---|
| User Identifier | The user's sub claim at the provider. Supports tokens. |
| The user's email address. Supports tokens. | |
| First Name | Supports tokens. |
| Last Name | Supports tokens. |
| Output Token Name | The token that receives the new user's ID. If the user can't be created, it receives the reason instead, such as DuplicateEmail or UsernameAlreadyExists, and the action fails. |
How sign-out works
When a user who signed in through a provider signs out:
- With Local logout only, or when the provider has no logout URL, they're signed out of the site only.
- Otherwise they're sent to the provider's logout URL with
post_logout_redirect_uriset to the Logout URI, plusid_token_hintandclient_idif those are turned on. The provider signs them out and sends them back to the Logout URI, which signs them out of the site. - With Logout user locally first, they're signed out of the site before they're sent to the provider.
Security
- HTTPS: login and logout URIs use HTTPS unless Callback URIs Insecure is on. Use the insecure settings only for local testing.
- Token validation: ID tokens are always checked against the provider's signing keys, issuer, audience and lifetime. If the provider rotates its keys, the connector reloads them automatically.
- Auto matching: see the caution in Matching existing users.
- Claims in actions: claims may contain personal data. Don't write them to logs or show them to other users unless you need to.
See Data Security for how single sign-on fits into the platform's security model.
Troubleshooting
| Problem | What to check |
|---|---|
| The provider reports a redirect URI mismatch | Copy the Login URI from the Hints section exactly, including case and https://. |
| Sign-in returns to the login page without signing in | The Issuer must match the token's iss claim exactly, including any trailing slash. The provider must also return sub, email, given_name and family_name. In Entra ID, add them as optional claims. |
| An invalid client error at the token endpoint | Check the Client Secret, and try the other Authentication Method. If the secret contains special characters, try URL-encode Credentials. |
| A user with the same email address was already created by a different authentication provider. | A site user with that email address already exists. Turn on Auto Match Existing Users, or add On Match Existing User Actions that load the right user. |
| Sign-out doesn't sign the user out at the provider | Check Local logout only, the Logout URI, and that the Logout URI is registered at the provider as a post-logout redirect URI. Keep Send Id Token Hint on. |
| No provider buttons on the login page | Check that Enable Authentication and Enable provider are on, and that the general settings were saved. |
See Also
- Users
- Load User
- Grant User Role
- Display Error Message
- Data Security
- OpenID Connect Core 1.0 specification
Last updated: November 18, 2026