Migrating to Bootstrap 5
When your website uses Bootstrap, it's crucial to stay updated with the most recent version. This article explains how to migrate your website from Bootstrap 3 to Bootstrap 5.
Why Bootstrap 5?
Bootstrap is over ten years old and there have been major rewrites in 2020 and 2021. As a result, Bootstrap 5 solves a lot of problems over the existing Bootstrap 3. It has a modern look and uses modern CSS techniques. Furthermore, it's easier to find developers who want to work in Bootstrap 5 because there's not a lot of interest in working on older technologies. Bootstrap 5 has more modern libraries, pre-built templates that are maintained, and theme builders.
Learn More
Bootstrap 3 Removal Is Coming — Is Your App Ready? | The Low-Code Café #197 - Watch Now
Making Configuration Changes For Each Page
To migrate your website to Bootstrap 5 using the Plant an App tools, it's essential to understand that you can't use Bootstrap 3 and Bootstrap 5 simultaneously on one page. Therefore, each page of your site that uses Plant an App tools must be configured to use either Bootstrap 3 or Bootstrap 5. Each tool on your site has its own unique set of configuration changes that you need to make during the migration process.
This process can include changes in your form templates, theme settings, views in your listings, and entity configurations. Remember, instructions for carrying out these changes are provided later in this guide, under each tool's segment. For a smooth transition, carefully follow the respective guide for each tool on your website to ensure a seamless migration process.
By taking this approach, you ensure that each page aligns perfectly with the new aesthetic and functional advantages that Bootstrap 5 brings, while also maintaining the integrity of your website's overall look and feel.
Quick Summary - Migrating Custom Pages
Each page of your site that uses
Change the page to a Bootstrap 5 Theme Layout in
Page Settings / Advanced / Appearance.Open all your pages and modules in edit mode.
Change forms template to Bootstrap 5 in
Forms / Settings / Template.Change tab settings theme to Bootstrap 5 in
Tab / Settings / Theme.Change listing from Legacy to Data Table view in
Listing / Views.Test your changes.
Reverting is the same process in reverse order.
Migrating Entities and Auto-generated Pages
Flip the bootstrap switch in your entity configuration.
Generate the views.
Test your changes.
Reverting can be done manually but there isn't a click button to take you back from Bootstrap 5 to Bootstrap 3.
Best Practices
Find a Bootstrap 5 theme from the DNN Store.
Test all your existing applications thoroughly before starting the conversion.
Use a clone site to test and if necessary you can just revert it without impacting your production site.
Work off in a hidden corner of your website a page that's not public so that you can try Bootstrap 5 techniques without necessarily affecting your system.
It's important to note that every control and every form field, a lot of content was migrated, rewritten or touched in some way during the conversion process, so testing is going to be crucial.
Remember to test extensively and always have a back-up plan or revert in case something doesn't work as expected.
Migration Details
Forms
Converting Forms from Bootstrap 3 to Bootstrap 5: A Detailed Guide
Upgrading your website's forms to utilize the current features and capabilities offered by Bootstrap 5 (BS5) is a vital step in the migration process from Bootstrap 3 (BS3). In this guide, we will be providing comprehensive steps on how you can convert your forms from BS3 to BS5.
Step 1: Setup and Preparation
First and foremost, make certain that your website is ready for the upgrade process. You need to have a BS5 compatible theme installed on your site. In terms of safety taking a backup of your website before initiating this process is always advisable.
Step 2: Turn on Bootstrap 5
Navigate to the page settings on your website. You'll find an option labeled 'Appearance' under the 'Advanced' tab. In this section, make sure to select a BS5 Theme layout.
Step 3: Open Forms in Edit Mode
After enabling BS5, the next step involves accessing the form you intend to convert. Navigate to the page containing the form and open it in edit mode.
Step 4: Modifying Form Template Settings
With the form opened in edit mode, navigate to the 'Settings' section. Within settings, look for an option labeled 'Template.' This option will indicate which Bootstrap version the form is currently configured to use. For a form set to BS3, the 'Template' setting will show 'Bootstrap 3'. To transition to BS5, change the 'Template' setting to 'Bootstrap 5'.
Step 5: Save Your Changes
Having switched the form template to BS5, make sure to save the form. This will apply the changes you've made.
Step 6: Testing
With the changes saved, it's now time to test the effectiveness of the conversion. Refresh the page containing your form. If the migration was successful, the form should exhibit the modernized aesthetic characteristics associated with BS5.
Remember, beyond just visual changes, it's vital to ensure that all form functionalities are working as expected. Check to make sure data is being captured correctly and that actions triggered by form submission (like email notifications, validation responses, etc.) are correctly operational.
Forms that use Dynamic Containers
Dynamic containers in the Form Builder behave and are displayed differently between Bootstrap version 3 and version 5. While this isn't a limitation or a problem in itself (just a change of behavior), it is important to understand how the display of the Dynamic Containers in your Form will change when migrating from BS3 to BS5.
Behavior in Bootstrap 3
When adding dynamic fields to a version 3 dynamic container, each new field will be added and stacked to the right of the previous one, based on the width of the container. For example, if the container was 2 columns wide and 3 fields were added, a total of 6 columns will be displayed on a single row.
To illustrate, let's take two dynamic field containers ("Monday" and "Tuesday") and subsequent dynamic fields (selectable hourly intervals). While the containers will be displayed on different rows, their respective fields will be displayed horizontally, on unique columns:
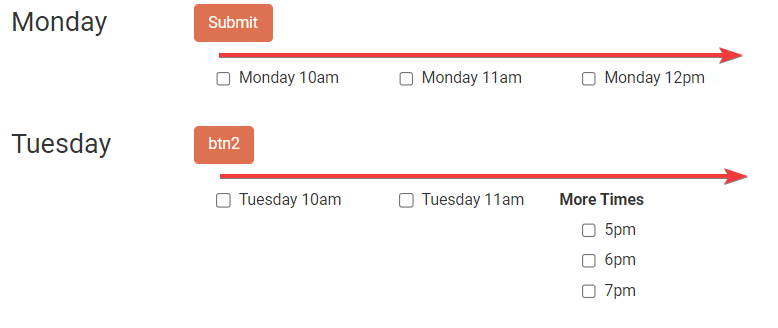
This will happen regardless of what is defined under the "Layout" section of the Form Builder (see the "Layout" section on the "Forms: Main Menu and Usage" page). As such, even if the dynamic fields are set to be displayed on different lines, they will be displayed as columns regardless.
Behavior in Bootstrap 5
When adding dynamic fields to a Bootstrap 5 dynamic container, each new field is added below the previous one. For example, if the container was 2 columns wide and 3 fields were added, a total of 2 columns will be displayed on 3 rows.
Taking the same example as above, with two dynamic field containers ("Monday" and "Tuesday") and subsequent dynamic fields (selectable hourly intervals), they will be displayed vertically, as follows:

This is considered to be a more logical behavior and has thus been adopted as the default behavior in BS5.
Achieve the Bootstrap 3 behavior in Bootstrap 5
If you still prefer the Bootstrap 3 display while using the Bootstrap 5 template, you can achieve this by adding multiple dynamic containers and arranging them side-by-side (under the "Layout" section of your Form Builder). For example, adding 3 dynamic containers arranged 2 columns wide and on the same row, then adding 1 field to each, a total of 6 columns will be displayed on one row.
Listings
Converting Listings from Bootstrap 3 to Bootstrap 5: A Detailed Guide
When looking to migrate your website to newer, better versions of Bootstrap, one of the significant steps involves converting listings. Listings or tables are crucial elements of most websites, displaying data neatly and accessibly. This guide will provide detailed steps to convert Listings from Bootstrap 3 (BS3) to Bootstrap 5 (BS5).
Step 1: Preparation
Before beginning the conversion process, it's vital to ensure you have everything you need. You should have a Bootstrap 5 compatible theme installed and ready for use. It's recommended to back up your website before starting, as you can never be too sure when dealing with significant upgrades as this.
Step 2: Enabling Bootstrap 5
Navigate to your page settings, under the "Advanced" tab, you'll find an "Appearance" option. In this section, select a Bootstrap 5 Theme layout.
Step 3: Opening Your Listings in Edit Mode
Navigate to the page or module containing the listing you plan to convert. Open this listing in edit mode. This process may slightly vary depending on whether your website uses custom pages or auto-generated pages.
Step 4: Switching View Types on Your Listing
Once you're in the edit mode for your listing, navigate to the "Views" section. You'll see various view options, including "Legacy" and "Data Table". The "Legacy" view corresponds to Bootstrap 3, while "Data Table" corresponds to Bootstrap 5.
Disable the "Legacy" view to prevent Bootstrap 3 from loading anymore on your listing. Next, enable the "Data Table" view. It's important to note that you wouldn't be able to use both views simultaneously – you must switch off the "Legacy" view before you can switch on the "Data Table" view.
Step 5: Save Your Changes
After successfully replacing "Legacy" with "Data Table", save your changes.
Step 6: Testing
Once you've saved your changes, refresh the page containing your listing. If the conversion was successful, your listing should now have a more modern look in line with Bootstrap 5 styling.
Make sure to thoroughly test your new listing, ensuring that it not only looks right but also functions correctly. This could involve checking that search and filter functions still work accurately and ensuring that more complex functionality is still operational.
Tab Builder
Converting Tabs from Bootstrap 3 to Bootstrap 5: A Detailed Guide
Navigating through different components easily and efficiently is a crucial aspect of seamless user experience, and Tabs play a significant role in this. If you're considering upgrading your website from Bootstrap 3 (BS3) to Bootstrap 5 (BS5), converting your tabs is an integral part of the process. This guide provides a detailed step-by-step process to convert Tabs from BS3 to BS5.
Step 1: Preparation
Before commencing the conversion process, ensure you have a Bootstrap 5 compatible theme installed and ready to be deployed. It's recommended to backup your website before beginning any significant changes to ensure you can restore to a previous version if needed.
Step 2: Enabling Bootstrap 5
Navigate to the page settings, specifically under the "Advanced" tab, where you'll find the "Appearance" option. In this section, opt for a Bootstrap 5 theme layout.
Step 3: Opening Your Tabs in Edit Mode
Head to the page or module containing the tab that needs conversion. Open the tab in edit mode.
Step 4: Switching to Bootstrap 5 Theme on Your Tab
While you're in edit mode for your tab, proceed to "Settings". Here, you can find 'UI settings' where you'll see the option for Bootstrap 3 and Bootstrap 5 themes. Opt for the Bootstrap 5 theme.
Step 5: Save Your Changes
After updating to the Bootstrap 5 theme on your tab, save your changes.
Step 6: Testing
Once all changes have been saved, refresh the page containing your tab. If the conversion was successful, you'll note a more modern look for your tab, aligned with the style traits of Bootstrap 5.
Remember to conduct extensive testing of your new tab. Verify that it not only appears correct but that it also functions as it should. This may involve checking the seamless navigation between different tabs and ensuring any additional functionality tied to the tabs remains operational.
Localization
The Localization settings file location changes from Bootstrap 3 to Bootstrap 5. When migrating from BS3 to BS5, you will need to set the Resource File from its new location.
What is Localization and how is it used?
Localization allows you to automatically translate standard contextual elements such as buttons, messages or tooltips according to the user's language interface. For example, you can set a "Submit" button on your form in English to be automatically translated to "Absenden" when displayed in German, or "Soumettre" when displayed in French.
The different translation are stored in a "Resource File", which location changes from Bootstrap 3 to Bootstrap 5.
Migrating from Bootstrap 3 to Bootstrap 5
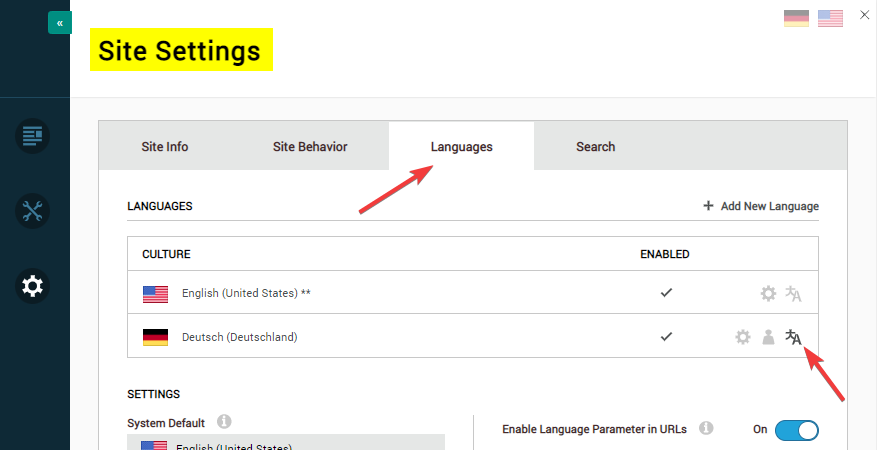
The Localization path is dependent on the Bootstrap 3 or 5 used in your Form Builder (see the "UI & Layout" section on the "Forms: Settings" page). To access the localization settings for a specific language, go to your "Site Settings" > "Languages" tab and click the "Languages" button.
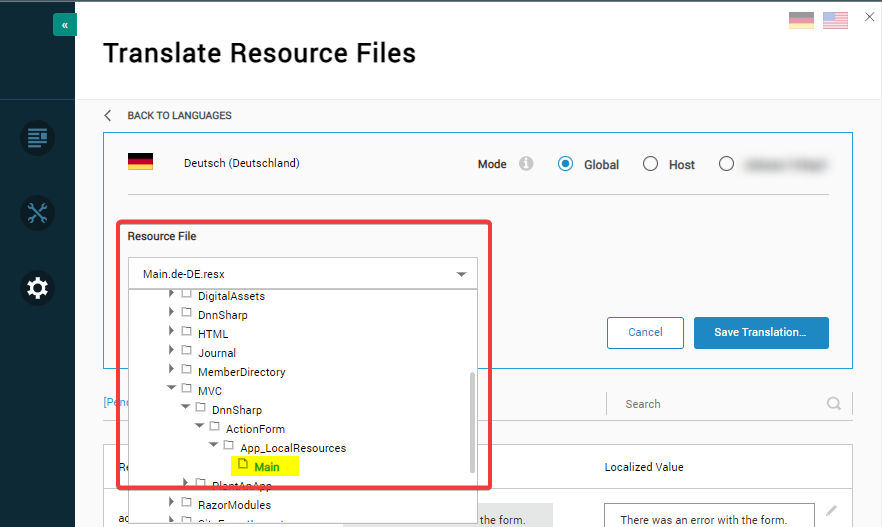
- The "Bootstrap 5" template Resource File gets localized from:
LocalResources / DesktopModules / MVC / DnnSharp / ActionForm / App_LocalResources / Main
- The "Bootstrap 3 (Obsolete)" template Resource File gets localized from:
Local Resources / DesktopModules / DnnSharp / ActionForm / App_LocalResources / Form

As such, when migrating from BS3 to BS5, please make sure that:
- You update the Localization from the new path
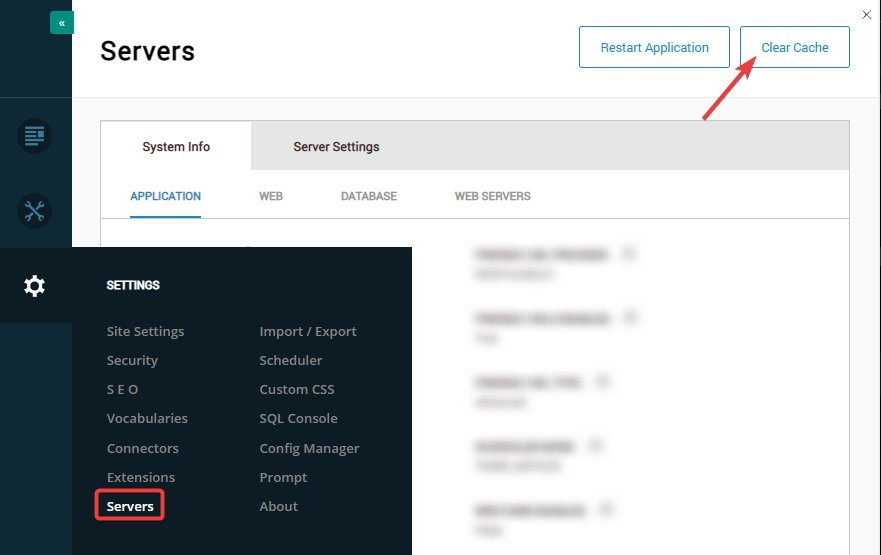
- Go to "Servers" and click "
Clear Cache"
Back to the top ⤴`
Revised 05/29/2026