Entities
General Description
Entities define the data model of the application. This is sometimes referred to as Data Structure or Structured Content. This is where you establish the data elements in your application and how they relate to each other. For a simple application, you could begin your design right here. For a more complex app, you may want to create a visual representation of your data model first and then create your entities based on that. Plant an App also creates a visual view of the relation between your Entities. You can view this by toggling to the Dependency View on the Entities tab.
Plant an App automatically includes four default Entities: Users, Roles, Documents, and Images. These cannot be removed or edited. They will not appear in the Dependency View unless added as a dependency to one of the Entities.
Navigating the Entity Tab
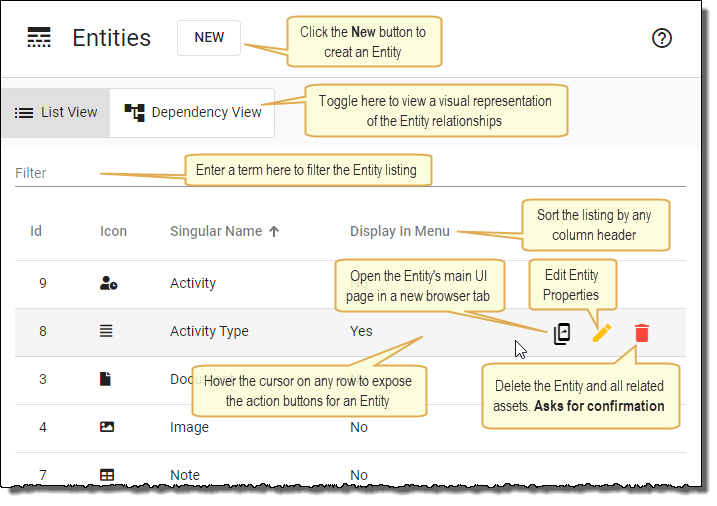
When you first load the Entity tab in Configuration you will see a message inviting you to create your first Entity. After you have created at least one Entity, on subsequent loads of the Entity tab you see a list of all your Entities and Plant an App Built-in Entities. Click the New button at the top of the page to create an Entity.
By default, you will see the List View of Entities, but you can also view a visual representation of the relation between Entities by toggling to the Dependency View. Just above the Entity Listing, there is a Filter option where you can type a term to filter the list of Entities. As your application grows, this will be very useful.
Each time you load the tab, the Entity list is sorted alphabetically by the Singular Name column. Simply click any of the column headers once to sort the listing ascending by that column and again to sort descending. Hover any Entity row to expose the Entity's action buttons. These buttons allow you to View the Entity page in a new tab, Edit the Entity, or Delete the Entity.
Assets Created
When you create an Entity, Plant An App automatically generates database tables, application screens including input forms and data grids, and APIs that allow user interaction with the data. Specifically, the following is created with a new Entity:
- Database tables with index keys and foreign keys based on the relations you define between your entities
- A new page for the Entity that can either be in the menu or not and can be defined as a top level page or as a child of an existing page
- A new page for viewing details of an entry created (hidden from menu and accessed when clicking the link for an entry in the grid)
- A form for data entry with fields based on the properties you define
- A listing grid to show the records in the Entity
- A data source for the Entity to be used wherever you can select data sources
- UI buttons providing the ability to create, edit, delete and view entries
- Custom actions for create, delete, partial update, update and read operations added to the list of Plant an App core actions specifically for the Entity
- APIs for creating, retrieving, updating, and deleting records
- Optionally, a visual dashboard where you can define KPIs based on the data from the Entity
Entity General Settings
When creating an Entity, the first tab will present you with some General settings for the Entity. These include the Name and settings that define the User Interface that is created when the Entity is saved.
| Setting | Description |
|---|---|
| Name | You must define both a singular and plural value for the Entity name and these values must be unique. Caution: Avoid using MS SQL Reserved Words. Refer to Reserved Keywords (Transact-SQL). The singular value will be used (with spaces and special characters removed) as the SQL table name for your Entity and anywhere a singular value is appropriate in the UI. The plural value will be used as the name of the page that is created and anywhere a plural value is appropriate in the UI. |
| Icon | You may select a custom icon for the Entity that will appear on Entry detail pages, the Entity tab in Configuration, and other places in the UI. If you do not select one, the 'Table' icon will be used. |
| Enable Indexing | If you enable indexing, entries in your entity will be automatically indexed and will be returned in results for the default site search. |
| Display In Menu | This determines whether the page that is created for the Entity will appear in the main site menu. If you turn this off, you will likely need to create links to the page in your UI for users to access the Entity. |
| Include Dashboard | Enable this setting if you want to include a KPI Dashboard on the primary listing page generated for this Entity. The first time you set it, an empty Dashboard will be generated and added. Subsequent toggles of this setting will only show or hide it for non-developer users, but it will not be deleted. |
| API Access | Provides automatically generate API Endpoints to Create, Read, Update, and Delete records for the Entity. Enable this setting to generate Get, Post, Put, and Delete endpoints for the entity. Disable it to remove the automatically generated endpoints. |
| Parent Page | This determines where in the site hierarchy the page will be located. If you do not specify a parent page, the page will be located at the site root. Even if you choose to not display the page in the menu, you should still place the page correctly in the site hierarchy as this also impacts the URL for your page. |
| Display After | Set the location of the page in relation to other pages under the same Parent Page. The items available in the dropdown update based on the page selected in the Parent Page setting. You can choose to display the page last, first, or after one of the existing pages. This setting impacts the ordering of the site menu. |
Entity Properties
Property Settings
| Setting | Description |
|---|---|
| Name | The column name in the SQL table. Caution: Avoid using MS SQL Reserved Words. Refer to Reserved Keywords (Transact-SQL). |
| Type | Choose from the Primitive, Entity, or List of Entities Property types |
| Default Value | When adding a Required property to an existing entity, the selected default value will be applied to existing records |
| Required | Selecting the Required option for a Property sets the required validation on the associated form field, but it also sets the associated database column to 'not null'. This is important to keep in mind if you plan on adding any direct insert or update queries on this Entity to your application. |
| Searchable | Selecting the Searchable option determines whether the property will be searched when you using the Entity's grid search field and when using the application main search. |
| Filterable | If the Filterable option is selected, the associated column in the Entity's grid will have a dropdown in the column header allowing the grid to be filtered by a selected value. This also will add an index key for the associated column in the database table. |
| Sortable | Selecting the sortable option will make the column header of this property a link that will sort the column by its values when clicked. This also will add an index key for the associated column in the database table. |
Property Types
When you create an Entity, you need to define the properties of the Entity. Plant an App adds five built-in properties for each Entity: ID, CreateBy, CreatedDate, LastModifiedBy, and LastModifiedDate. You add Custom Properties to define your Entity and specify the Type for each property. You will see three sections in the property selection dialogue: Primitive, Entities, and List of Entities.
Primitive Properties
The first section lists the standard or Primitive data types. Selecting these types will create corresponding form fields and database fields. To better understand what is created in the form and database table when you select one of the primitive types, reference the table below.
| Property Type | Form Field | Database Field |
|---|---|---|
| Boolean | True/False (Checkbox) | bit |
| Date | Date Time Picker with Date Picker Type and formatted as MM/dd/yyyy | date |
| Date and Time | Date Time Picker with Date and Time Picker Type and formatted as MM/dd/yyyy hh:mm tt | datetime2(7) |
| Text Box with maximum 320 characters and Email Address validation | nvarchar(320) | |
| Large Text | Large Text initialized with 3 rows | nvarchar(max) |
| Local Date and Time | Date Time Picker with Date and Time Picker Type and formatted as MM/dd/yyyy hh:mm tt | datetimeoffset(7) |
| Money | Currency set to USD | decimal(19, 4) |
| Number (Decimal) | Text Box with Floating Point Number validation | decimal(18,4) |
| Number (Integer) | Number with Integer Number validation | int |
| Phone | Phone with initial format set by Browser Country Code | nvarchar(15) |
| Text | Text Box with maximum 450 characters | nvarchar(450) |
| Time | Date Time Picker with Time Picker Type and formatted as hh:mm tt | time(7) |
| Url | Text Box with maximum 2000 characters and Web Address validation | nvarchar(2000) |
Entities
The second section lists existing Entities from your application that can be used to populate a selection menu for the current Entity. For example, if you are creating a list of Tasks, you may have a specified list of Task Types defined in another Entity. You could add a Task Type property to the current Entity and select the Task Type Entity as the Property Type. This would create a field with a selection menu of Task Types.
List of Entities
The third section also lists existing Entities from your application. However, selecting an Entity from here allows you to define a list of entries from the child Entity related to an entry in the current Entity. For example, if the current Entity (Parent) will be a list of Projects and each Project needs to have a list of tasks attached to it, you would add a property called Tasks and select the Tasks Entity (Child) under List of Entities. This property type does not create a form field. Instead, it will add a column to the Parent Entity listing with a link to view the Child Entity listing filtered for entries related to the selected Parent Entity and to add entries to the Child Entity. It also creates a relationship table in the database that stores the relationship between the parent and child Entities.
How to Choose 'Entities' or 'List of Entities'
To decide if you should select Entities or List of Entities, you need to consider the relationship between the Entities.
If you want an entry in the Parent Entity to be related to just one entry in the Child Entity, then choose Entities. This will store just the one ID of the related entry in the associated column in the Parent Entity's database table.
However, if you want any entry from the Parent Entity to be able to be related to one or more entries from the Child Entity, then choose List of Entities. When you choose this option a new table is created that stores relationships between entries in the Parent and Child Entities.
Display Name
Choose one Property Name from the dropdown. This property will be used in the 'Assets Created' as the primary display property. For example, this property will be used in a listing to hyperlink to the detail record.
Permissions
Before setting permissions for your Entities, you will need to consider how your permission model relates to your data model and then set up Roles for your application. Once you have custom roles configured you will then see them on the permissions screen when creating or editing an Entity.
| Entity Permission | Description |
|---|---|
| Can View | Determines which entries members of the role are able to see in the Entity grid. The choices are All Entries, Own Entries (Entries created by the logged in user), or None. If set to None and the user has any other permission enabled, they will see the page and will see an error in the grid. |
| Can Add | Determines whether members of the role are able to add entries to the Entity. If true, the user will see a New button or Add button at the top of the Entity grid. |
| Can Edit | Determines which Entries the user is able to Edit. The choices are All Entries, Own Entries (Entries created by the logged in user), or None. |
| Can Delete | Determines which Entries the user is able to Delete. The choices are All Entries, Own Entries (Entries created by the logged in user), or None. |
To remove permission to view the Entity page to members of a role, the View, Edit, and Delete permissions must be set to None, and the Add permission disabled. It is not sufficient to simply set the view permission to None.
What does it mean to 'Own' an entry?
Currently, the user that created an entry is the owner of that entry. This means when you select Own Entries from the permission dropdowns, you are giving permission to the user that created the entry. However, in the future Plant an App plans to add functionality that will allow admins to transfer ownership of an entry.