Overview
General Description
A workflow consists of an orchestrated and repeatable pattern of activity, enabled by the systematic organization of resources into processes that transform materials, provide services, or process information. It can be depicted as a sequence of operations, the work of a person or group, the work of an organization of staff, or one or more simple or complex mechanisms.
From a more abstract or higher-level perspective, workflows may be considered a view or representation of real work. The flow being described may refer to a document, service, or product that is being transferred from one step to another.
Workflows may be viewed as one fundamental building block to be combined with other parts of an organization's structure such as information technology, teams, projects, and hierarchies.
In Plant an App we have lists of actions of various types to be performed in a sequence, optionally with conditional logic. Additionally, creating a workflow itself adds to that list of actions allowing one workflow to call another.
Type of Workflows
- Business logic (defined in Workflows in the admin part)
- UI Logic (used mostly for UI logic inside forms, grids, APIs, scheduled jobs or, guides)
- Though business logic can also be defined inline, it's not a good practice.
BPMN Overview
Description
Business Process Model and Notation (BPMN) is a graphical representation for specifying business processes in a business process model.
Originally developed by the Business Process Management Initiative (BPMI), BPMN has been maintained by the Object Management Group (OMG) since the two organizations merged in 2005. Version 2.0 of BPMN was released in January 2011, at which point the name was amended to Business Process Model and Notation to reflect the introduction of execution semantics, which were introduced alongside the existing notational and diagramming elements. Though it is an OMG specification, BPMN is also ratified as ISO 19510. The latest version is BPMN 2.0.2, published in January 2014.
How we use it
In Plant an App we currently use only this subset of modules:
- Start
- Exclusive Gateway
- Activities
- End
Start
Each business process has some form of initiating event. In BPMN terminology, it is called a start event. It is the first event of the process.
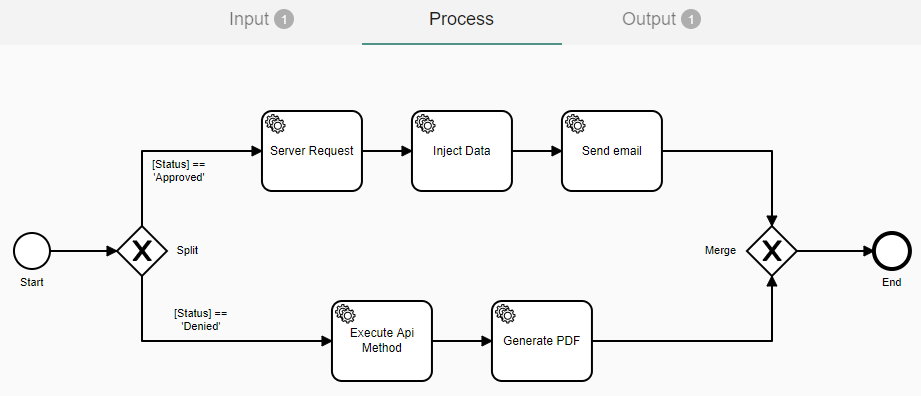
Exclusive Gateway
An exclusive gateway or XOR gateway is used to model a decision in a process definition.
When the execution of a workflow arrives at this gateway, all outgoing sequence flows are evaluated in the order in which they are defined. The first sequence flow whose condition evaluates to true is selected for propagating the token flow.
- In general, in BPMN 2.0, all sequence flows whose conditions evaluate to true are selected to continue in a parallel way. When using an exclusive gateway, only one sequence flow is selected.
- When multiple sequence flows have conditions that evaluate to true, only the first one defined is selected to continue the process.
- If no sequence flow can be selected, an exception will be thrown. To ensure a sequence flow will always be selected, have no condition on one of your flows. No condition will always evaluate to true.
Activities
Activities are the building blocks of BPMN 2.0, there would be no business process without them. In Plant an App we use activities as Actions which helps us build the flow model.
End
In business process modeling, every process has an ending. In BPMN, every path in every process must lead to an end event. Every process starts with a start event, moves through activities and gateways, and then reaches an end. When a business process model reaches an end event, it is complete. When a subprocess reaches an end event, the process flow returns to the parent process.
Difference
The main difference between BMPN.io and PlantAnApp Workflows is that we create an executable model in our platform, not only the visual part (flowcharts). When you create a Workflow, you make a sequence of actions created behind an entire model. For example, creating a user, assigning platform roles, creating invoices for a purchase, etc.
From a technical perspective, a Workflow can be considered a reusable method.
Workflows (Business logic)
Scope isolation
A Workflow has an isolated scope, which means that it will not have access to the context variables from where the workflow was executed. All the values that are required for the workflow to work need to be passed as input parameters.
Data must explicitly come in as input parameters, but this concept also applies to output parameters. To set variables in the context where the workflow was executed, you will have to specify explicitly what comes out as output parameters. Data can also come into the execution context of the workflow from sources other than the input parameters. For example, Run SQL Query or Server Request.
If the data is stored locally (e.g., Entities) the variables can be passed in using input parameters and use other actions to pull external data into the execution context. It is recommended to keep the actions inside the workflow when external data is required, and not outside the workflow. Managing one workflow is easier than preparing the input variables each time before the execution of the workflow resulting in less code to maintain.
Input Parameters
Naming Constraints
Only Alphanumeric characters are allowed (A-Z+0-9, case insensitive), and no white spaces.
Types
There are 2 types of input parameters: Primitive and Entities.
Primitive input parameters will restrict the variables that come in to be of the selected data type (e.g., Number) or validate them to be in the right format (e.g., Email). The token will contain the exact value that was passed.
Entities' input parameters need to be passed as Id's of the Entities (integers). The workflow will validate if the specified row of the entity exists. The tokens generated will contain data from that entire row.
Examples:
[InputParams]- Display Name[InputParams:Id]- id of the record[InputParams:<PropertyName>]- gives access to entity properties value
Input parameters are optional.
Output Parameters
Naming Constraints
Only Alphanumeric characters are allowed (A-Z+0-9, case insensitive), and no white spaces. You will need to specify the name of the output variable and the value of it. The output values can be either a free text or a token from inside the workflow execution context. (e.g., [Entity:Property] or [MyValue]). Those values will be passed back to the context where the Workflow was executed.
Process
What Are Actions?
Actions are blocks of code that are packed and ready to use in a workflow. Various actions out of the box can interact with the stored data (Run SQL query, Read Entity), external data (Server Request), deliver messages (Send Email), business logic (Execute JavaScript (Server)), or modules themselves (Execute JavaScript and Stop Execution, Refresh Grid). They only need parameters/configurations to work and deliver business logic. Usually, actions need some input parameters based on which they will execute their specific code. Some of the actions also have output tokens, resulting from the code being executed, that can be used in the next actions. This will give you the ability to create complex flows and obtain your custom business logic. When the workflow ends, you can attach the output tokens from the actions to the workflow's output parameters.
How to Add an Action to a Workflow
An Action can be added from the top bar in the workflow interface using the Add Action button or the Import button.
Alternatively, you can add a new action from the small icon set next to an existing action (or start block) when it is selected. The icon for the new action is the rectangle.
For both options, a popup will open and show the list of available actions. You can search on the top for a specific action or browse the list by expanding the categories. After you choose an action by clicking on it, the configuration popup will show. Click on Save at the bottom of the popup to save the action after you configure it. Configuring the action is not required at this point and it can be saved blank.
How to Configure Them
After you add an action you can click on it and a small icon set will appear on the right. The Action settings button is the wrench. By clicking it, the settings popup will show and you may start configuring the action. When you are done, click on Save at the bottom of the popup to save the action.
How to Access Input Parameters
Input parameters can be accessed as tokens directly in the actions (e.g., [MyParam]). Keep in mind that the entities' input parameters are expanded and you can access all the data of the entity (e.g., [MyEntityParam:Property] or [MyEntityParam:Id])
How to Access Other Data Through Actions or Tokens
Other data can be accessed with specific actions that read data from different sources. For example, you can read other entities' data based on a Server Request. This data comes into the execution context without being specified as an input parameter. Some actions in this category include Run SQL Query, Server Request, and Read Entity. Data also can come from Plant an App Tokens by passing some of the input parameters to the token. For example, it can bring back HTML code that can be used in a Generate PDF action to obtain a PDF document.
Importing an Action Configuration
You can also import an already configured action into a workflow to save time. To import an action, locate and select the desired action and then click the Export button. Copy the JSON presented in the popup. Then, in the workflow in which the action will be imported, click the Import button. The first time you perform this action, your browser will likely ask you to allow Plant an App access to your clipboard. The notification may look like this:

If the content of the clipboard is not valid code OR if your browser has denied access to the clipboard, a pop-up titled Import Actions will appear. If access to the clipboard has been denied, the Action or Array of Actions box will be empty and you can paste your code into it. Otherwise, it will be populated with the invalid code text from the clipboard as seen below:
Multiple actions can be imported individually, or, if they are in an Execute Actions action, then the Import Action will see it as a single action and you will find the other actions inside the Execute Actions action after import.
Execution Context
The tokens available in the execution of a workflow are the input parameters and all the other output tokens that were generated from the action of the workflow. Those tokens are available from the start of the execution of the workflow until the end. For more details read the Execution Context article.
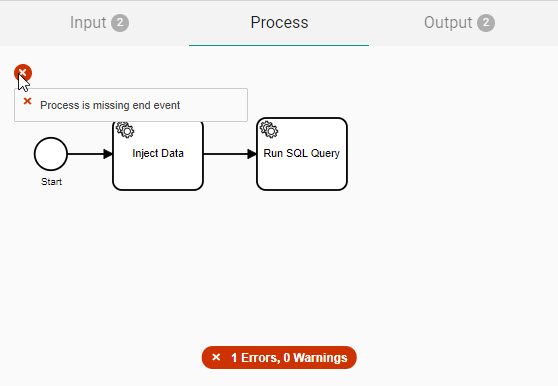
Validation
The workflow builder comes with built-in validation to keep workflow building easy and without errors. You can find the errors, if any, in the workflow builder interface at the bottom of the page or as an 'x' in a red circle near each action that has an error. Hovering over each error will describe the issue.
Testing workflows
After creating a Workflow, it can be tested using the Test Workflow button that looks like a play button in the right column of the workflow listing, on the line of the workflow you want to test.
If the workflow doesn't have input parameters configured in its settings, the Prepare Test pop-up will appear with a message stating "No parameters are required to execute this workflow". Clicking the Run button will execute the workflow and, at the bottom of the page, a message will appear displaying how long it took for the workflow to execute. If output parameters have been set, they will be displayed there also, with the returned values.
If the workflow does have input parameters, the pop-up will instead contain the input parameter(s) name(s) and an empty field for each one. You have to provide values for the input parameters to run the test. Once the Run button is clicked and the workflow executes, it will return a success message and output parameter values, if any.
If the workflow has any error, the error message will be displayed at the bottom of the page.
Cloning Workflows
A workflow can be duplicated and edited if there is an existing workflow that has logic similar to what is needed in a new workflow. In the main Workflow list, at the end of the row where the Workflow buttons are located, the last button (when hovered, the tooltip label is 'Duplicate') will immediately create a new workflow named with the name of the duplicated workflow appended with 'Copy' (e.g. 'Send Email to User Copy'). If the same (original) workflow is duplicated again, the name will have 'Copy 2' appended. The number will increment again as many times as the original workflow is duplicated.
After cloning a workflow, it will have exactly the same Input Parameters, Process Flow, and Output Parameters as the original workflow and will function the same. It should be edited to create a new process with the desired outcome and renamed appropriately.
UI Logic
After you create the Workflow, you have a powerful tool on your hands and can now integrate it in different scenarios. It can be used as an action called Execute [Name of Workflow], which calls it and executes its logic. Workflow actions are available on every product that supports the ability to execute an action, such as Forms, Listings, Automation, API, and Guides.
You can use a workflow after you finish the frontend Actions (e.g., closing a form from a pop-up, refreshing a listing grid). You then call the Workflow to run the special logic and use the Output returned in the subsequent actions.
Common examples:
- A form that collects data from a user and on a button click generates a PDF with a graph based on the user's responses.
- From a grid, on an item button, if you want to generate an Excel that contains the data from that row.
- In Automation, use a workflow to send a report on a specific day of the week based on the last week's activity.