Overview
General Description
A workflow consists of an orchestrated and repeatable pattern of activity, enabled by the systematic organization of resources into processes that transform materials, provide services, or process information. It can be depicted as a sequence of operations, the work of a person or group, the work of an organization of staff, or one or more simple or complex mechanisms.
From a higher-level perspective, workflows may be considered a view or representation of real work. The flow being described may refer to a document, service, or product that is being transferred from one step to another.
Workflows are a fundamental building block, combining with other organizational structures such as information technology, teams, projects, and hierarchies.
In Plant an App, workflows are composed of sequences of actions, which can be enhanced by conditional logic. Workflows can call each other, supporting modular and reusable logic.
Type of Workflows
- Business logic (defined in Workflows in the admin part)
- UI Logic (used mostly for logic inside forms, grids, APIs, scheduled jobs, or guides)
- While business logic can be defined inline, prefer using dedicated workflows for clarity and maintainability.
BPMN Overview
Description
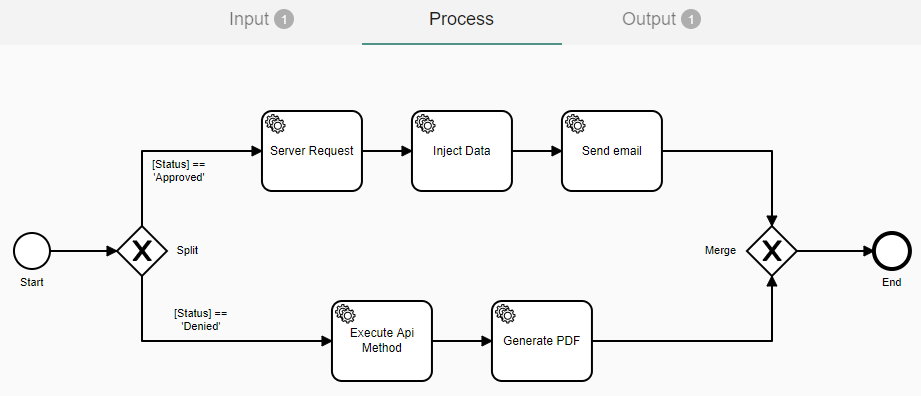
Business Process Model and Notation (BPMN) is a graphical notation for defining business processes.
BPMN is maintained by the Object Management Group (OMG) and is an ISO standard (ISO 19510). Version 2.0.2 is the latest.
How we use it
Plant an App uses a selected subset of BPMN modules:
- Start
- Exclusive Gateway
- Activities
- End
Start
The initiating event of every business process.
Exclusive Gateway
Used to model decisions. When the workflow reaches an Exclusive Gateway, outgoing conditions are evaluated in order, and the first that returns true is selected. Only a single path is followed per gateway; if no condition matches, an exception is thrown.
Activities
Correspond to Actions in Plant an App.
End
Marks the completion of each process path.
Difference
Unlike generic flowchart tools, Plant an App workflows are executable models: each component not only represents logic but also executes it. Workflows are reusable methods.

Workflows (Business Logic)
Scope Isolation
A workflow is executed in an isolated scope. Access to the calling context’s variables is only possible via Input Parameters. All required values must be passed explicitly.
Similarly, only Output Parameters are passed back to the context that called the workflow. To expose results, explicitly define output parameters.
You can also pull in data as needed within the workflow (e.g., using actions such as Run SQL Query or Server Request), but managing inputs/outputs within the workflow itself leads to cleaner, more maintainable logic.
Input Parameters
Naming Constraints
Alphanumeric only (A-Z, 0-9), case-insensitive. No spaces.
Types
- Primitive: Restricts format or type (e.g., Number, Email).
- Entity: Expects Entity Row IDs. Workflow will validate the existence of the row and provide access to all of its properties.
Examples:
[InputParams]- Display Name[InputParams:Id]- record ID[InputParams:<PropertyName>]- Entity property value
Input parameters are optional.
Descriptions
Each Input Parameter supports a description. As of v1.27, these descriptions are shown in the Workflow Test Run dialog. This improves usability by explaining the purpose of inputs during testing and when called as actions elsewhere. If the workflow uses a contract, the contract-defined parameter descriptions are also shown.
Output Parameters
Naming Constraints
Same as input parameters. Specify a name and value; the value can be a token or free text (e.g., [Entity:Property], [MyValue]).
Descriptions
As of v1.27, Output Parameter descriptions are shown in the Workflow Test Run dialog and when calling the workflow.
Explicit Output Wiring
Breaking change in v1.27:
Workflow Outputs are now only added to the caller's context if an Output Token is explicitly specified when calling the workflow (e.g., assigning to a named variable in the action configuration or workflow contract). Outputs will NOT automatically appear in context with the default workflow output names.
If any existing logic relies on implicit output mapping, it must be revised to use explicit output assignment.
Process
What Are Actions?
Blocks of pre-built logic (e.g., Run SQL query, Send Email). Actions require parameters and can optionally return tokens, which can be used in subsequent actions.
How to Add an Action to a Workflow
Use the Add Action button or the Import button in the UI. Alternatively, use the contextual buttons beside existing actions.
How to Configure Actions
After adding, click on the action and open settings (wrench icon). Edit and click Apply (previously Save).
- Action Pop-up Behavior Update (v1.27):
- The action editor is now modal: pressing
Escor clicking outside is disabled. - Actions in progress are only saved to the BPMN if the user clicks
Apply. - There is a
Cancelbutton that discards changes and closes the pop-up.
- The action editor is now modal: pressing
How to Access Input Parameters
Tokens with names matching the parameter names (e.g., [MyParam]) are accessible in actions. For entity inputs, access properties like [MyEntityParam:Property].
How to Access Other Data Through Actions or Tokens
Use actions to fetch additional data (e.g., Read Entity, Server Request). Tokens created this way are available throughout the workflow execution context.
Importing an Action Configuration
You can import or export actions as JSON. Select, export, copy, and then import via the UI. Imported actions appear either individually or within an Execute Actions container, depending on how they were exported.
Execution Context
Tokens available comprise both input parameters and outputs from actions within the workflow.
Validation
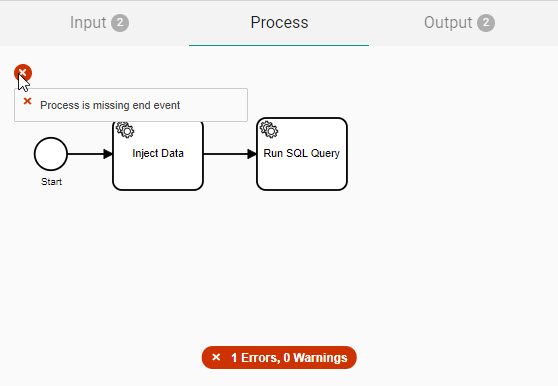
The builder offers real-time validation, showing errors on the interface and providing details on hover.

Testing Workflows
After creating a workflow, you can run test executions using the Test Workflow button.
- Parameter Descriptions:
Both input and output parameter descriptions are visibly shown in the test pop-up (including contract-based workflows). - Input Value Persistence:
The Save and Test dialog now remembers your previously entered input values for each workflow, per browser. When reopening the test pop-up or after page reloads, the most recent values are pre-filled for user convenience.- Values are associated per workflow and parameter name.
- If a parameter is renamed or deleted, its stored value does not load.
- UI/UX Enhancements:
- Elements are now visually aligned, including type, required status, and delete button.
- Descriptions and content align horizontally for multi-line or long text.
- Hovering over parameter rows highlights them with a gray background for clarity and focus.
- Entity Input Parameter Search:
- The entity parameter dropdown search refreshes correctly (Bug 7763 fixed).
Cloning Workflows
Workflows can be duplicated. The clone inherits all parameters and logic but should be renamed and edited for new use cases.
UI Logic
After creating a workflow, you can call it as an action (using Execute [Name of Workflow]) wherever actions are supported—Forms, Listings, Automation, APIs, and Guides.
Outputs from workflows—now only available via explicit output token assignment—can be referenced in subsequent actions.
Common uses:
- Generating PDFs, Excel exports, automated reports, etc.
User Interface & Workflow Builder Usability Improvements in v1.27
New Workflow UI is the Default
- Upon first accessing the Workflow screen, the new Workflow Builder is the default.
- Switching between UIs:
- Old UI displays:
"You are currently on the legacy Workflow Builder. We advise to switch to the new UI."
Button:Switch to New Builder - New UI displays:
"If you experience issues on the new Workflow Builder, switch to the Legacy UI."
Button:Switch to Legacy Builder
- Old UI displays:
UX/Visual Enhancements
- Condition Labels: Always visible and fully shown.
- Token Autocomplete: Improved for conditional gateway conditions.
- Parallel Gateway Labels: Now display as "Start Parallelization" and "End Parallelization".
- Consistent White Editor Background: BPMN area styling matches other editors.
- BPMN Interaction: Undo/Redo and copy-paste through keyboard are disabled to avoid unrecoverable errors.
- Add/Import/Export Buttons: Moved to a toolbar, visible only on the Process screen (mirrors Automation UX).
- Title/Label Ellipsis:
- When workflow/action titles are too long, ellipsis is used. Hover to view the full title.
- Workflow Listing:
- Buttons never wrap to two lines.
- Edit button is now a link (
<a>) supporting middle/ctrl+click to open in new tab. - Filter Namespace X button and autocomplete are fixed.
- Parameter Layout:
Titles, textboxes, types, checkboxes, default values, and descriptions align on the same baseline. - Parameter Row Hover:
Gray background highlight on parameter hover, consistent with General Settings UX. - Deletion UI:
Delete buttons are now center aligned. - Relabeling:
Fields now follow the updated static label layout. - Error Messaging:
When deleting branches and conditions in an Exclusive Gateway, you will get this message:
"An Exclusive Gateway branch is missing a condition. If you are deleting an entire branch, make sure the branch is fully deleted; the branch may still exist between the Split and the Merge."
Change Detection and Save Workflow Buttons
- The UI now detects unsaved changes reliably. This includes changes in actions, gateways, layout, and conditions.
- Buttons:
- Back
- Save (disabled if no changes)
- Test (runs on current saved version; if unsaved changes exist, prompts to Save or test on previous version)
- Leaving With Unsaved Changes:
Any attempt to leave—via navigation, left menu, browser refresh, back button, or closing the tab—triggers the Unsaved Changes prompt if appropriate.
Action Editor Modal (Pop-up) Improvements
- Can only be closed by clicking
Apply(to keep changes) orCancel(to discard). - Cancel does not save changes; changes are only kept when Apply is clicked.
Escand clicking outside do nothing.
Potential Breaking Changes
Workflow Output Context Injection
- Outputs from called workflows are not auto-inserted into the calling context anymore.
- You must assign outputs explicitly by naming the Output Token for each output you wish to propagate.
- Review any existing workflows that may rely on the previous (implicit) output mapping logic and update them as needed.
Related Improvements and Fixed Bugs
- Enhanced error messages for workflow branches and conditions.
- Fixed UI glitches and parameter search bugs.
- Standardized style, hover, and text alignment across all workflow-related interfaces.