Page Management
General Description#
The Pages tab in Plant an App Configuration allows users with access to Configuration to view the site's top-level pages and child pages by selecting a parent page. Existing page properties can be edited (if the page was not created by Entity Builder) and new pages can be created. Pages can be moved to new locations in the page hierarchy or quickly moved up and down under the current Parent Page. Certain functions are disabled depending on the assigned Roles of the logged-in user.
note
The Pages tab is available to anyone with access to Configuration. However, the ability to view the page listing, create a page, or edit properties of or move any given page is based on Plant an App permissions and NOT the specific page's Edit permissions. See below for details on Permissions.
Permissions#
Permissions for the Pages tab in Configuration is based on specific Plant an App permissions and not on specific Page's edit permissions. If a user is in a role with access to Configuration they will see the tab listed, but what they can do will be limited by their roles. Below is a permissions grid that shows which roles can see the Page listing and which tasks they can do.
| Role | View Page Listing | Add Page | Edit Page Properties | Move Page | Delete Page |
|---|---|---|---|---|---|
| Admins | ✓ | ✓ | |||
| Citizen Developers | ✓ | ✓ | ✓ | ✓ | ✓ |
| Low-Code Engineer | ✓ | ✓ | ✓ | ✓ | ✓ |
| Administrators | ✓ | ✓ | ✓ | ✓ | ✓ |
| Super Users | ✓ | ✓ | ✓ | ✓ | ✓ |
| All other roles |
Viewing the Page Listing#
Each column in the Page listing has specific information and features that are noted below.
| Column | Detail |
|---|---|
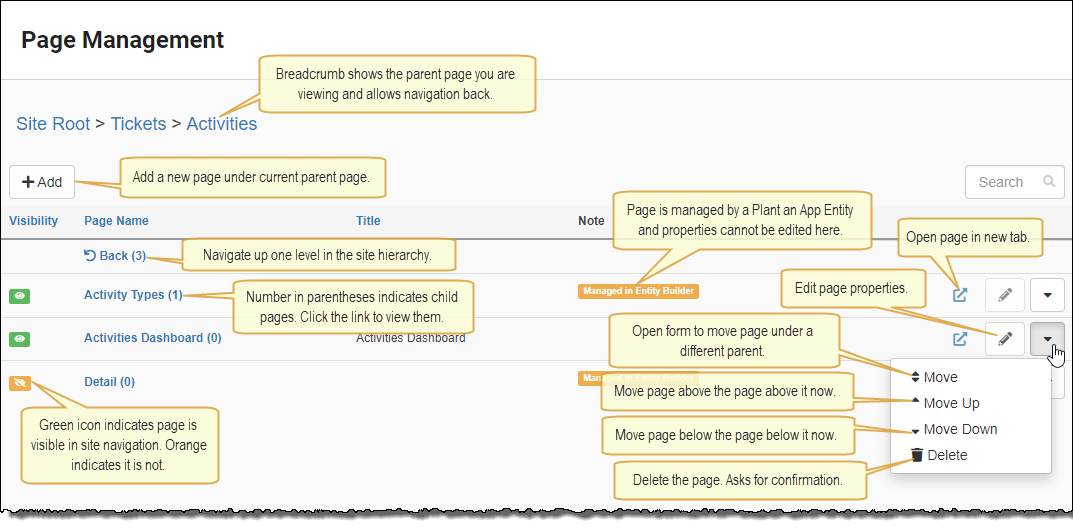
| Visible | The icon in this column indicates whether a page is visible in the site navigation. A green eye  indicates it is visible and an orange eye with a slash indicates it is visible and an orange eye with a slash  indicates it is not visible. indicates it is not visible. |
| Page Name | This column not only shows you the Name of the page but also tells you whether it has child pages and allows you to show the child pages in the listing. After the page name is a number in parentheses. If it is 0, there are no child pages. If greater than 0, click the page name to see the child pages. Once you are viewing a Child page listing, the top row of the listing will have a Back link to go up a level in the page hierarchy. |
| Title | The title for the page, if specified, will appear in this column. |
| Note | Pages created by the Plant an App Entity Builder (Entities) will have orange highlighted text in this column that says "Managed in Entity Builder". This is important because these pages will have the Edit button in the right column disabled. To edit the visibility, permissions, or names of these pages, you must edit the Entity associated with the page. |
| Button Column | The last column in the listing has buttons that allow you to open the page, edit the properties, move the page and delete it. See the screenshot below for details on these buttons. |
Add a New Page#
- Using the links in the Page Name column navigate to the Parent page under which you want to create a new page.
- Click the Add button in the upper left of the page.
- In the pop-up form, Under Visible in Menu, choose whether the page will be visible in the site navigation.
- Specify a Page Name. This will be used in navigation and the URL for the page. (REQUIRED)
- Optionally Specify a Page Title.
- In the View Permission dropdown, select the Roles that are allowed to view the page. (REQUIRED)
- In the Edit Permission dropdown, Optionally select Roles that are allowed to edit the page.
- Click Save.
Edit Page Properties#
- Locate the page you want to edit in the listing.
- On that row, in the right column, click the Edit button. It has a pencil icon on it.
- In the pop-up form, make the property changes you want. This form has the same fields as the Add Page form.
- Click Save.
Move a Page#
There are two ways to move a page. You can either just move it up and down in the page order under its current parent, or you can move it under a different parent page. The order of pages matters because that is the order they will appear in your site navigation.
If you just want to change the order of the page under the current parent follow these steps:
- Locate the page in the listing and then click the rightmost button on that row (with the down arrow) to drop down additional buttons.
- Click either one of the Move Up or Move Down buttons. They do exactly what they say and you will see the change immediately.
- You can continue to click the same button to keep moving the page up or down.
If you want to move a page under a new parent, or you want to place it under a specific page, use the Move button:
- Locate the page in the listing and then click the rightmost button on that row (with the down arrow) to drop down additional buttons.
- Click the Move button.
- Choose a Move Action:
- Above moves the page immediately above the page you select in the Move Target dropdown, even if it is under a different parent page.
- Below moves the page immediately below the page you select in the Move Target dropdown, even if it is under a different parent page.
- Under moves the page as a child of the page you select in the Move Target dropdown and places it in the last position under that page.
- In the Move Target dropdown, select the page you want the page you are moving to be moved above, below or under based on your selection in Move Action.
- The action you are taking will be confirmed for you above the Save button.
- Click Save to complete the move.