Automation Jobs
In Plant an App, Automations are executed as Jobs, which contain Triggers and Actions. A Trigger is an event that will start executing all the Actions assigned to the Job. As such, a Job is a combination of Triggers and Actions.
The main page of the Jobs section allows you to create a new automation job from scratch or import and edit an already exported one.

NEW JOBOpens the job creation page.IMPORTWill open a pop-up "Import Job" editor that will allow you to paste and edit an already existing job in a JSON format. Within the editor, you can choose to overwrite an existing Job with the same name.
If you do not check the Overwrite box, the job will be imported with the "_Copy" suffix concatenated to its name.
If the box is checked, the job will be imported as such and will replace any pre-existing job with the same name.
The same main page shows your full Jobs list and allows you to Run, Edit and Disable them.
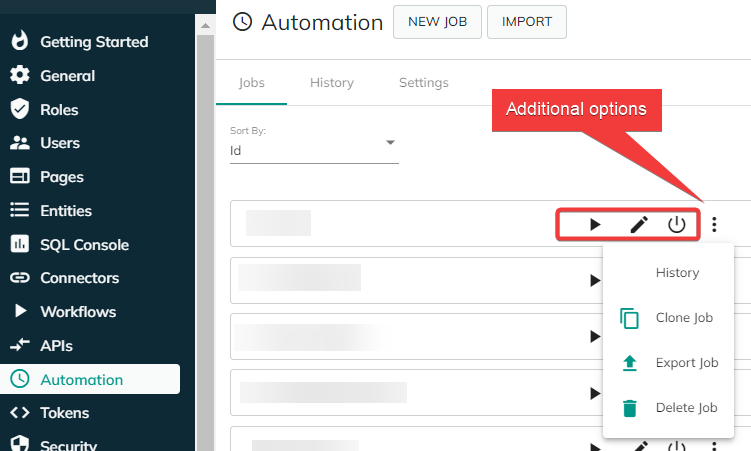
The Additional options button enable you to Clone, Export (as JSON file), and Delete each Job, as well as checking its execution History (see the job "History" page of this section).
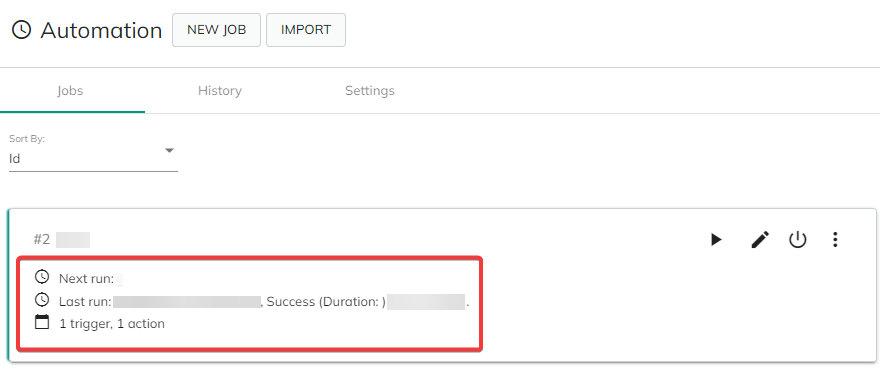
Clicking the Job name will expand its view and provide you details about its last execution (and if it was successful), when the next run is scheduled and how many Triggers and Actions it contains.
New Job configuration
1. Settings
Main configuration fields for each Job.
| Field | Notes |
|---|---|
| Name | Mandatory; please choose a unique name for every job in order to uniquely identify it. |
| Context Portal | Defaults to the current portal; this settings affects the result of the [Portal:*] tokens. |
| Context User | Optional; this settings affects the result of the [User:*] tokens as well as actions such as Send Mail and Grant Role (see below). |
| Debug Mode | Checking this box allows you to get more information in the Job History section. |
Other than the Context User field, additional users can be added later from the Context > Load User action.
2. Triggers
In this section you can define one or more triggers that will cause the Job to execute.
UI Controls
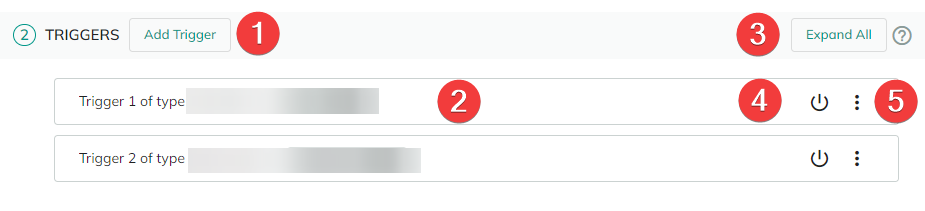
- To create a new Trigger, click the
Add Triggerbutton ①. - Expand/collapse a Trigger configuration section by clicking on its tile bar ②.
- Alternatively, click the
Expand Allbutton ③ to expand all Triggers' config sections . - Disable/Enable a Trigger by clicking the "Power" button ④.
- Use the "Options" button ⑤ to either Delete or Clone a Trigger.
You need to click the Save button in the upper-right corner of the screen for changes (configuration changes, deletions, etc.) to take effect.
You can create as many Triggers as you want, but they will be parsed in the order they were created/they are displayed.
Types
There are four types of Triggers you can define in Plant an App:
App Events- triggers activated by application events and statesDatabase- triggers activated by Database actions (such as insert, delete, update)Time- time based triggersUsers- user-related triggers (creation, login, etc.)
For detailed information about the Triggers types, configuration and use, please see the Job Triggers page of this section.
3. Actions
Here you can define the Actions that will be executed when a Trigger fires.
UI Controls
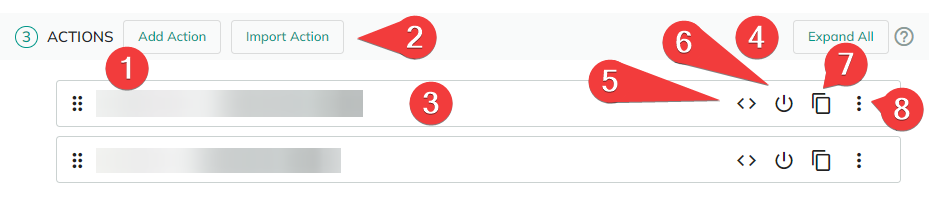
- To create a new Action, click the
Add Actionbutton ①. Note that its name is editable. - Import an Action (JSON format) by clicking the
Import Actionbutton ②. - Expand/collapse an Action configuration section by clicking on its tile bar ③.
- Alternatively, click the
Expand Allbutton ④ to expand all Actions' config sections . - The "Edit Condition" button ⑤ is used to determine if this action will execute (Boolean expression). Use it to enable or disable actions programmatically. For example, enabling a ShowError action only makes sense if an error is found. This field supports Tokens.
- Disable/Enable a Trigger by clicking the "Power" button ⑥.
- The
Copybutton ⑦ allows you to copy the Action as a JSON file. You will then be able to paste and edit it in theImport Actionsection for example. - Use the "Options" button ⑧ to either Delete, Export (as JSON) or Clone an Action.
For detailed information about the Action types, configuration and use, please see the Actions documentation section page.
You need to click the Save button in the upper-right corner of the screen for changes (configuration changes, deletions, etc.) to take effect.
You can create as many Actions as you want and you can modify their order by drag-and-drop.

4. On Error
The Actions defined in this section will execute when the current job encounters an error. Specifically for this context, the following tokens are available to help you identify:
- The action that failed: [
ActionId], [ActionName], [ActionDescription] - The error itself: [
ErrorType], [ErrorMessage], [StackTrace]
UI Controls
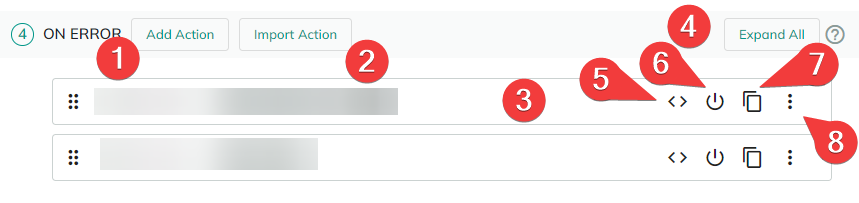
- To create a new Error Action, click the
Add Actionbutton ①. Note that its name is editable. - Import an Action (JSON format) by clicking the
Import Actionbutton ②. - Expand/collapse an Action configuration section by clicking on its tile bar ③.
- Alternatively, click the
Expand Allbutton ④ to expand all Actions' config sections. - The "Edit Condition" button ⑤ is used to determine if this action will execute (Boolean expression). Use it to enable or disable actions programmatically. For example, enabling a ShowError action only makes sense if an error is found. This field supports Tokens.
- Disable/Enable a Trigger by clicking the "Power" button ⑥.
- The
Copybutton ⑦ allows you to copy the Action as a JSON file. You will then be able to paste and edit it in theImport Actionsection for example. - Use the "Options" button ⑧ to either Delete, Export (as JSON) or Clone an Action.
For detailed information about the Error Action types, configuration and use, please see the Actions documentation section page.
You need to click the Save button in the upper-right corner of the screen for changes (configuration changes, deletions, etc.) to take effect.
You can create as many Error Actions as you want and you can modify their order by drag-and-drop.