Token usage - Examples and Usecases
This section presents some simple, hands-on token usage examples in response to real scenarios. As "Core" or "standard" token usage is straightforward and detailed on this page, it will not be covered here. The examples below address different strategies for creating and using custom tokens in various scenarios.
Data Replication
You have a piece of text that is being repeatedly used in various contexts (let’s call them "Html Modules") and that needs to change periodically - for example, the version of a specific component. Normally, we would need to update all the Html modules that display the version number manually. This procedure is not only time-consuming but is also prone to errors, mistakes or omissions.
Solution
Hold the "Version" value in a custom token.
Start by creating a new namespace, let’s call it "
MyComponent" (see the "Custom Tokens and Namespaces" page for more details about the custom token creation process).In the newly created namespace, generate a new Token called "
Version" and set its type to "Constant Token". In the "Content" box, input "1.2" (that would represent the current version of the component) and save the token.Replace all the instances of the "1.2" text in all your HTML Modules with the
[MyComponent:Version]token.
When the 1.3 of the component is released, simply update the value of the "Version" token to "1.3". That will be reflected everywhere on the website.
Module integration
Let’s assume we have a third-party product catalog module. While it does its job very well, it's lacking utility modules; for example, there isn't a module that would allow us to display the latest added product on the homepage. Normally, you would manually add an HTML module and update it every time a new product is added, but this is an overhead which gets bigger as products are added.
Solution
Use a database token.
Start by analyzing the database, see how the "Product Catalog" module holds data. Let’s assume that there is a "
Products" table that has following columns:ProductId,ProductName,ProductDescriptionandDateAdded.Once the data has been identified, we can create a database token. Start by creating the namespace -
LatestProductfor example.Create a new database token. In Step 2 of the wizard, we’ll extract the
ProductId Column. Let’s do a simple query -Select * From Products OrderBy DateAdded Desc. Plant an App will only use the first row, which (because of the ordering) is the latest added product. InColumnfield writeProductId. Save the token.Repeat the previous step in order to create the rest of the tokens. The Sql Query stays the same, it is only the Column that changes (there is some overhead with repeating the SQL in this process, but we’re planning to simplify it in a future release).
We now should have the following tokens:
[LatestProduct:Id],[LatestProduct:Name],[LatestProduct:Description]and[LatestProduct:DateAdded].To use the token, we create an Html module and invoke all the tokens. Here's an example of what the HTML code could look like:
<a href="/Products.aspx?id=[LatestProduct:Id]">[LatestProduct:Name]</a>
<br />
[LatestProduct:Description]
<br />
Added [LatestProduct:DateAdded]
Combine Tokens
We need to display the "Country Name" on a page that varies based on a parameter we receive in the URL, which is the country code. The URL could look like this: www.mywebsite.com/Default.aspx?CountryCode=US (or if you have the "URL Adapter" add-on: www.mywebsite.com/CountryCode/US/Default.aspx).
Solution
We use a predefined GET token source that will get us the country code and the "Lists" table in the database where Plant an App saves country information.
Create a new token -
CurrentCountry.Set it as "Database Query" type token.
Set the SQL query as:
SELECT Text FROM {databaseOwner}[{objectQualifier}Lists]
    where ListName = 'Country' and Value = '[Get:CountryCode]'
Notice the [Get:CountryCode] token; it will get the country code from the URL and will use it to build the "Where" clause.
Give the token a generous caching time since country names don’t change often (let’s say 86400 - 1 day).
Put "Text" in the Default Column textbox (this is the name of the column we need).
Save the token.
Note that you will not be able to test this token with the "Test Tokens" feature because you will be unable to set the "GET" parameters. To test it, please instantiate an HTML module and insert the token ("[MyNamespace:CurrentCountry]" for example). Now, append the country code to the URL ("www.domain.com/Default.aspx?CountryCode=US" for example) and the module should display "United States".
Get a List of Items from JSON
You make a request to a web service to get a list of items which you will need to put into a "Select" query. The web service will, most likely, not be able to return a list of properly formatted items that can directly be inserted into a list - just an array of items as a JSON.
Solution
We need to transform the JSON by using a Razor script.
Create a token to get the JSON. For testing purposes, you can create a constant token in which you add the JSON below (in a normal scenario, you would need an "HTTP Request" token to get the JSON first).
`[ {id: 1, name: 'item 1'}, {id: 2, name: 'item 2'} ]`Name it "
[My:Json]".Create a new Razor Script in C#. In the "Assemblies" area, add the "
System.Web.Extensions.dll" library (without the quotes).Write the following Script Body:
@{
var js = new System.Web.Script.Serialization.JavaScriptSerializer();
dynamic obj = js.Deserialize<object>(My.Json.ToString());
}

<select>
@foreach (dynamic item in obj) {
<option value="@item["id"]">@item["name"]</option>
}
</select>
Save this as "
[My:List]".
That is all you need: now, whenever you’re using [My:List], you will embed the list from the web service.
Using JavaScript and Razor scripts
See the example code snippets below.
Razor script:
  @{
  var greeting = "Welcome to our site!";
  }
  function myFunction(message) {
  alert(message);
  }
  myFunction (@greeting);
JavaScript:
JSvar = @greeting;
For that to work, you’ll need to adjust the Razor script a bit.
@{
var greeting = "Welcome to our site!";
}
function myFunction(message) {
alert(message);
}
myFunction ('@greeting');
Notice the " ` " (apostrophes) needed for myFunction.
Razor will compile the script above to:
function myFunction(message) {
alert(message);
}
myFunction ('Welcome to our site!');
This is a valid JavaScript code.
For best results, the Plant an App API endpoint can be used to make an AJAX request to get the string. You can set a Display Message action that prints a string like “Welcome to our site!” or the contents of a token.
Database Tokens to returning more than the First Row
At the moment, due to the way tokens are structured in Plant an App, they will only return the first row for any query. It will however return as many columns as the table has by appending the token with the column name.
Solution
If you would like the token to return all rows in a query, you can either use a Razor Script or an API Endpoint.
- Razor Script method
Use a "@foreach" to loop over a database token to get you all the results you need. For example:
    @foreach (var row in My.Token) {
    <li>row.ColumnName</li>
    }
- API Endpoint method
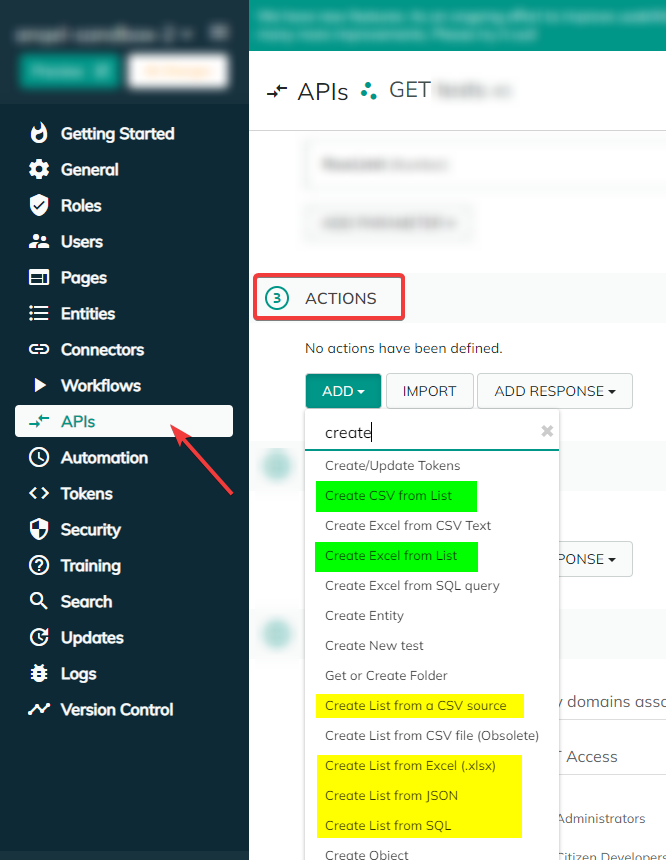
Use the "Create List From <source>" and "Create <output> from List" actions. Just open or create a new API endpoint and under section ③, "Actions" select: "Add".
You have the choice between "CSV source", "Excel" and "JSON" as sources.
You can then create "CSV" and "Excel" outputs with the second action.
How to use Tokens to return a specific data back in this same JSON format
If you need to generate JSON data with Tokens, you have the option to create a Razor script that generates a JSON. Some objects also have a ToJson or ToJsonArray method, such as the database tokens which might be of help.
If you are looking to implement an Angular application yourself, the most suited method would be through the API Endpoint. You can configure a web service to return JSON data.
Best way to use Custom Tokens
Let's thake the following example scenario:
SELECT Id, Name, Notes, StudentId
FROM  some table
where StudentId=convert(int,[get:sid]) and Id=[User:UserId]
Although it works, you don’t necessarily need to convert to int (integer) if the result is already in the format. Token replacement happens as a string replacement before the query is executed. Make sure to add single quotes around tokens when they are strings in SQL. For example:
select * from Users where UserName='[username]'.
Accessing a GUID through a database cell
If you would like to see if a GUID (globally unique identifier) matches up both on your site and the external database, use "[Portal:GUID]" to return the GUID of the current site.
Optional token parameters and variable number of parameters in Razor Scripts
You can access the token parameters list and iterate through them. For example:
@using avt.MyTokens.Core.Objects
@{
var tknParams = Tokens.TknParams as TknParamsObject;
ITokenObject format;
if (!tknParams.Properties.TryGetValue("Format", out format)) {
format = new ValueObject<string>("default value");
}
var formatArguments = new List<string>();
int i = 0;
ITokenObject fmtArg;
while (tknParams.Properties.TryGetValue("arg" + i, out fmtArg)) {
formatArguments.Add(fmtArg.ToString());
i++;
}
var formatStr = format.ToString();
var result = string.Format(formatStr, formatArguments.ToArray());
}
@result
Starting on the first line we have the using statement for avt.MyTokens.Core.Objects namespace, which is needed in order to have access to the TknParamsObject class. To access the list of parameters passed to the token, we use the "Properties" property of the tknParams variable (which type is TknParamsObject).
The "Properties" property type is Dictionary<string, ITokenObject>; this will grant access to all the Dictionary methods defined by .net, such as ContainsKey, TryGetValue, etc. Note that the keys in the dictionary are case insensitive.
The values of the token parameters that are stored inside the Properties as ITokenObject are actually instances of the ValueObject<object> class, which properly implements the "ToString()" method. As such, you can use it to get the string representation of the parameter’s value.
In the example above, the "Format" parameter is optional and in case it is not passed to the token, it will recieve a default value.
Note also that the token in the example supports a variable number of parameters in the format arg{number}.
Here are two examples on how to call such a token:
[Namespace:Token(format="my argument is: {0}", arg0="arg value")]
This example will result in the "my argument is: arg value" string.
[Namespace:Token(Format="arg0 is {0}, arg1 is {1}", Arg0="arg0 value", arg1="arg1 value")]
This will return the "arg0 is arg0 value, arg1 is arg1 value" string.