Custom Tokens and Namespaces
In this section you will find details and information about how to create new Namespaces and Custom Tokens within Plant an App.
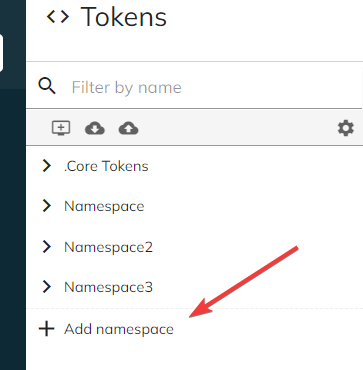
Namespaces
A namespace acts as a container for tokens. In the token syntax, it appears before token name - for example: [Namespace:TokenName].
You can create multiple namespaces for your custom tokens. To create a new namespace, simply click the "Add namespace" button.
In the Create new namespace prompt that appears, please fill the two fields:
Name(mandatory field) - a name to uniquely identify your namespace. Must start with a letter and contain only alphanumerical characters.Description(optional field) - a short description of the namespace or what type of tokens the namespace will hold.
The Name is a unique identifier; you cannot have more than one namespace with the same name.
Your new namespace will be created once you click the Create button.
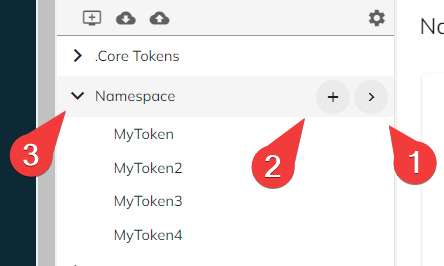
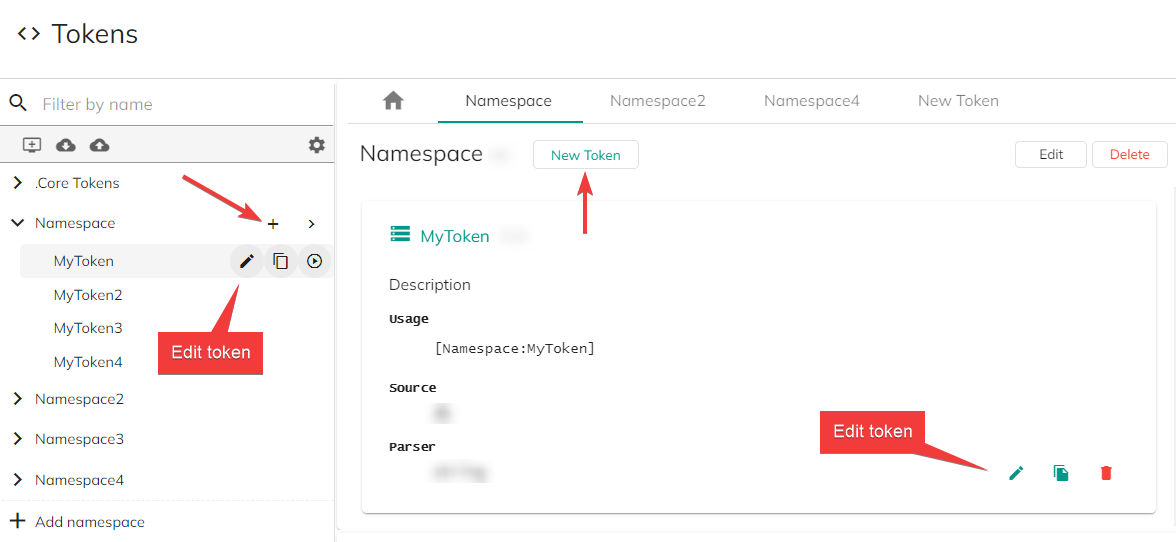
To view details about your namespace, click the ">" button ①. This will display the details in the main pane to the right.
To add a token to your namespace, click the "+" button ②.
To expand your namespace and list all the tokens it contains, click the "Expand" button ③.
When selected, the "Details" pane displays all your namespace tokens in detail (see the Custom Tokens section, below), as well as general controls:
- The
Editbutton takes you to the same prompt as the Create new namespace (see above) and allows you to update the name and descriptiuon for your namespace. - The
Deletebtton will delete the whole namespace and all the tokens it contains (⚠). New Tokenallows you directly add a new custom token in the selected namespace (see the Custom Tokens section, below).
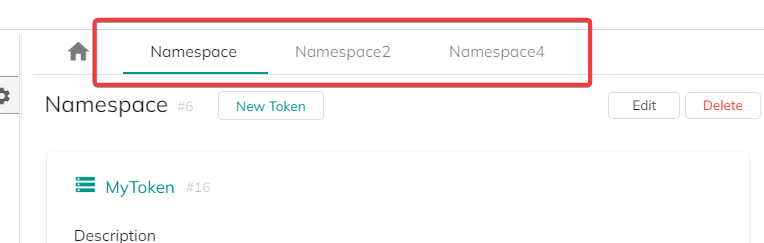
Note that you can open multiple namespaces at once (on the "Details" section) and each of them will create a new tab for easy navigation between them.
Custom tokens
You can create your own custom tokens to be used in different Plant an App contexts. They will be defined within namespaces (see above).
Create/edit a custom token
To create a new token, you can either click the "+" sign next to the namespace's name or the "New Token" button within the namespace's details pane.
To edit an existing token, click the "Edit token" button in the right side of the screen, adjacent to the token you wish to edit.
Whether you want to create a new token or edit an existing one, the parameters you will have to define or edit are the same. There are four expandable sections (click on their respective name to expand/collapse them) in your token configuration:
Token Info- general information about the token.Definition- set the token type and adjacent details.Cache- enable/disable your token caching and the caching layer.Options- additional options.
Token Info
| Parameter | Details |
|---|---|
| Token Name | Mandatory field. The token name is used to access this token from other modules. It must not contain spaces. It also has to be unique in the namespace it belongs to. |
| Namespace | Mandatory field. The namespace the token belongs to. Note that you can select it from a predefined, drop-down list that contains all your existent namespaces. |
| Default Value | Optional field. Specify default value to use if token doesn't return any data. This field can contain other tokens. |
| Description | Optional field. Provide a descriptive text for this token. |
Definition
Define your token type from the five available, listed below. Note that you can change the token type at any time by clicking the Change Type button.
Constant Token
This token type is useful for reusing a piece of information across the application, such as a version number, an e-mail address or the authentication data to a third party service.
The token will be replaced with the string provided in the "Content" field. Notice that the string can call to other tokens by using the syntax [Namespace:TokenName] and selecting the "Replace Tokens" option in the parser (see the Options section, below).
Database Query
Allows you to pull data from local or external database by executing a custom SQL query.
Required parameters:
| Parameter | Details |
|---|---|
| Connection String | See here for syntax. Leave empty to connect to the application database. Can contain other tokens. |
| SQL Query | Can call to other other tokens/scripts using the [Source:TokenName] syntax. Can contain other tokens; use the "{databaseOwner}" placeholders to make the query generic and easy to migrate to other sites. |
| Default Column | Select the default column of the DB. This value will be returned when the token is invoked as [Namespace:TokenName]. |
| Columns | Choose which column to convert to tokens. Enter one column per line. The columns can be accessed by using the following syntax: [Namespace:TokenNane.ColumnName]. |
Razor Script
The Razor script syntax combines C# with HTML to provide ultimate flexibility in terms of generating views or running custom logic.
Required parameters:
| Parameter | Details |
|---|---|
| Code Language | Choose your preferred syntax for writing Razor templates: C# or VB.NET. |
| Debug | Toggle OFF/ON. Activating the option means that the script will be compiled in debug mode which will produce additional information as well as allow debugging by attaching to the process in Visual Studio. |
| Additional Assemblies | Reference additional assemblies/libraries to be able to use them inside the script. Input one assembly per line, for example System.Web.Services.dll. If the assembly is located in the /bin folder instead of GAC, use following syntax: ~/bin/Your.Assembly.dll. |
| Script | The Razor script itself. Note that it can call to other other tokens by using the @Namespace.TokenName syntax. Also note that you can press the F11 key for fullscreen editing mode and the Esc key to exit fullscreen editing. |
HTTP Request
Token performs a raw HTTP request to the given URL, optionally passing data via POST or Query String, and returns the output.
Required parameters:
| Parameter | Details |
|---|---|
| URL | Provide the URL upon which the request will be made. The URL can contain other tokens. |
| Query String | Please see here for information. Optionally, provide GET parameters to send to given URL. Input one parameter per line, by using the "name=value" format. Both the name and the value can contain other tokens. |
| Headers | Useful to integrate with RESTful Web Services/REST APIs that expect some of the data to pass through the headers. The accepted format is: "<HeaderName>:<HeaderValue>". Enter one pair per line. |
| POST Data | Optionally, provide POST parameters to send to given URL. Input one parameter per line, by using the "name=value" format. Both the name and the value can contain other tokens. |
Run Workflow
Executes a Plant an App Workflow and allows accessing the workflow output parameters as tokens.
Simply select a pre-defined workflow from the the drop-down list.
Cache
| Parameter | Notes |
|---|---|
| Cache Time (seconds) | Time in seconds to keep the output generated by this token cached. Caching helps improve performance as it saves roundtrips to database, calls to external URLs and CPU cycles. Set to "0" to disable caching. |
| Layer | If cache is needed, make sure the cache layer matches the token specification. For example, if the token output varies based on the roles of the currently logged in user, then set the cache layer to Role. Available layers: Global, Portal, User, Role and UserSession. |
For more information about the token caching layers and caching strategies, please see the subsequent "Token Caching" page in this same section.
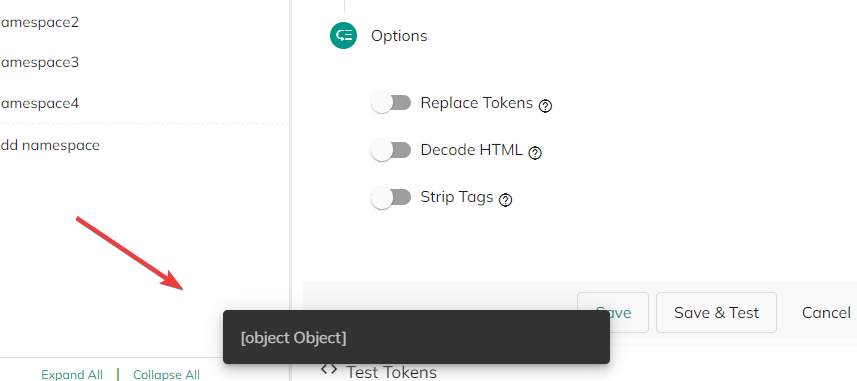
Options
Additional options (toggle switches, OFF/ON):
Replace Tokens: Enable this option to replace tokens in the output returned by the definition above.Decode HTML: Some token definitions will return the escaped HTML code, for example "<p>" instead of "<p>". Enabling this option will decode the HTML, so it displays properly.Strip Tags: This option strips all HTML or XML tags from the output returned by the token definition. The result is the plain content previously contained within tags.
When your token modifications are complete, simply click the Save or Save & Test button to save your changes. The latter also allows you to directly test the token you have been configuring and will directly return its value on a pop-up dialog in the lower part of the window.
The Cancel button will discard all the changes made since the last save.
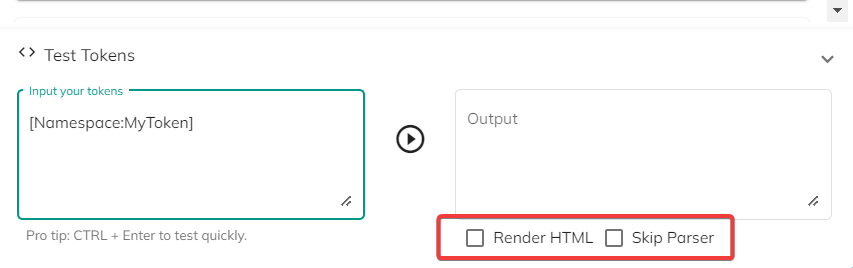
Test Tokens feature
Found in the lower part of the main page, this feature allows you to test your tokens and check their output on-the-spot. You can expand it by clicking the "<> Test Tokens" bar in the bottom of the main page.
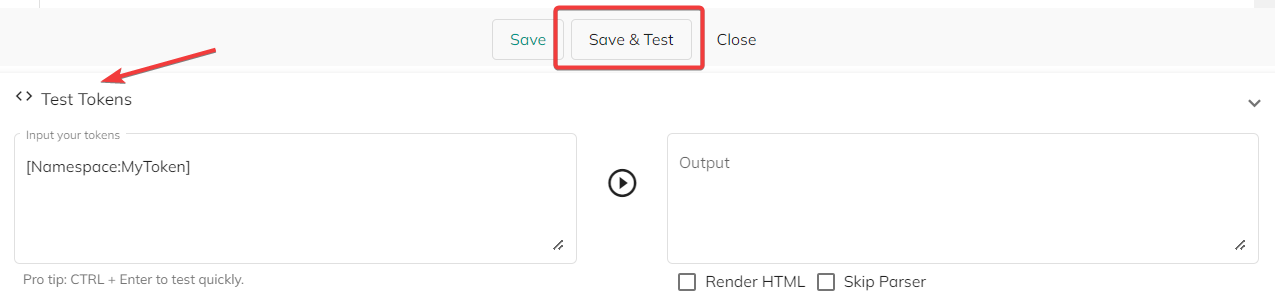
To test your token, simply type it in the Input your tokens field and click the "▷" button. The result of the token will be displayed in the "Output" field to the right.
You can also save and test directly your token by using the Save & Test button from the token editor. Note that this will directly return its value on a pop-up dialog in the lower part of the window.
There are also two checkable options for how the tester feature should interpret the results of the token to be displayed:
Render HTML- checking this option will render the output of the HTML code (if the token returns HTML). Unchecking it will display the raw HTML code.Skip Parser- check this option if you want the tested token to have its parsers skipped (data will be displayed as it is). Token Parsers provide the ability to process data (such as executing a regular expression or executing an XPath against an XML or JSON) after it has been retrieved from the Token Source.