Lifecycle Designer
Entity Lifecycle is a concept feature. It's still being developed and can change before it's released.
Audience:
Low-code EngineersSkill Prerequisites:
Entities,Workflows
General Description
You design a lifecycle in the entity editor: a State property on the Properties tab, then its states and transitions on the Lifecycle tab. This page describes both, and the rules the platform applies when you save. For what the lifecycle does once it's saved, see Running Transitions.
Adding a State Property
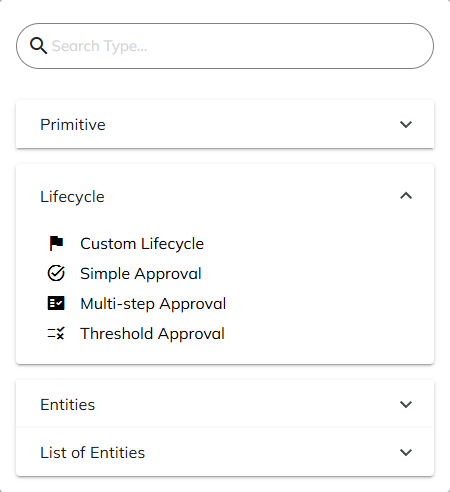
Add a property on the Properties tab and click its type. The type picker lists a Lifecycle category between Primitive and Entities:
- Custom Lifecycle makes the property a State property with a starting lifecycle that you then design yourself.
- Each lifecycle template makes it a State property with a ready-made lifecycle. Hover a template to read its description.
In the properties table, the Type column of a State property shows the template's name, or Custom Lifecycle. The gear button next to the type, Lifecycle: states and transitions, opens the Lifecycle tab on that property's lifecycle.
| What's created | Details |
|---|---|
| Database field | nvarchar(100). It stores the key of the record's state, not its name. |
| Edit form | A disabled dropdown that shows the record's current state. Only transitions change it. |
| Add form | No field. A new record always starts in the initial state. |
You can't turn an existing property into a State property, because the type of a saved property can't change. To replace a text "Status" property, add a new State property.
Lifecycle Templates
A template that has settings first opens Set up {Template}, with the template's description and one field per setting. Click Use {Template} to apply it, or Cancel to leave the property as it was. A roles setting can stay empty, which means anyone who can edit the record.
| Template | States | Settings |
|---|---|---|
| Simple Approval | Draft (initial), Submitted, Approved (final), Rejected. Submit, then Approve or Reject; Revise takes a rejected record back to Draft. | Who approves |
| Multi-step Approval | As Simple Approval, with Second Approval between Submitted and Approved. Either approval step can reject. | First approval by, Second approval by |
| Threshold Approval | As Multi-step Approval, but the second approval is needed only from a threshold. From Submitted, Approve goes to Approved while the value is below the threshold, and to Second Approval otherwise. Submit requires the compared value. | Property to compare (a Money, Decimal or Integer property of the entity), Second approval from, First approval by, Second approval by |
Every template adds a Rejection Reason property (Large Text), unless the entity already has a property with that name, and makes it required to Reject. Its field rules hide Rejection Reason in every state but Rejected, where it's read-only, so it's entered only in the Reject popup.
The result is an ordinary lifecycle. You can change everything on the Lifecycle tab afterwards.
The Lifecycle Tab
The Lifecycle tab shows after Permissions while the entity has at least one State property. It has a bar, the state chart and a panel for the selected state or transition.
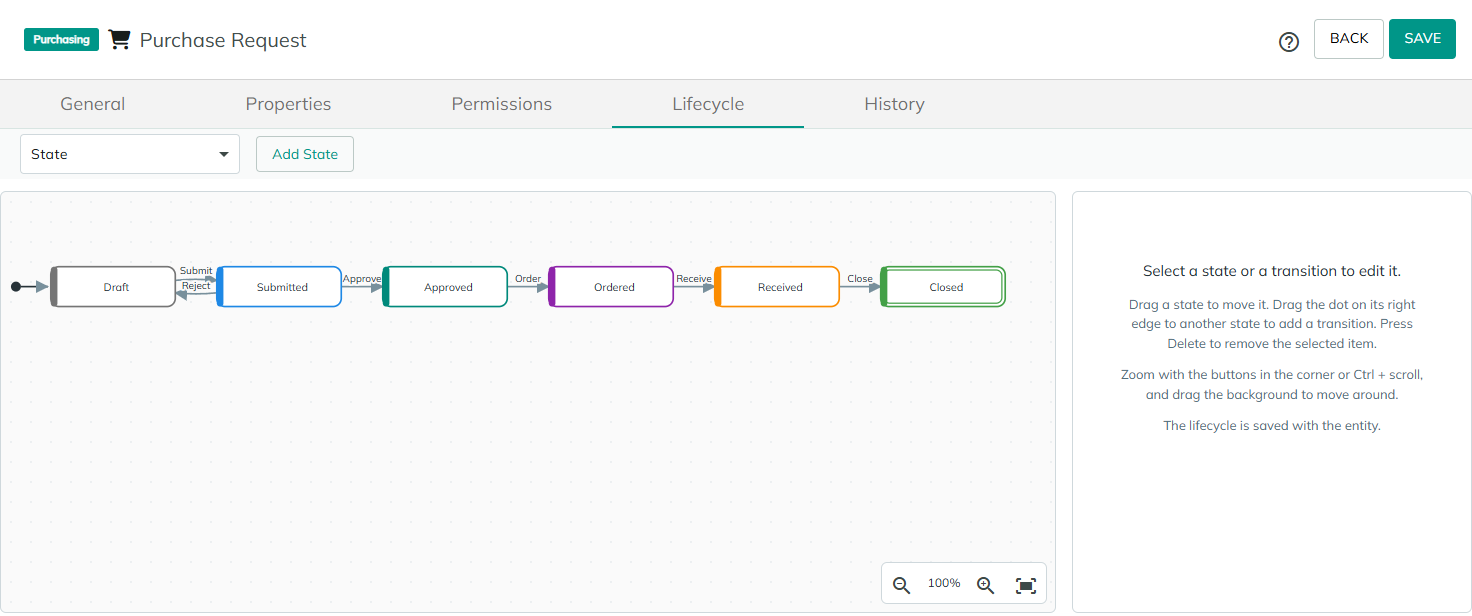
- The bar: the State property selector, which picks the lifecycle to edit when the entity has more than one State property, and Add State.
- The state chart: states are rounded boxes with a stripe and border in the state's color. A final state has a double border, and the initial state has a dot-and-arrow marker. Transitions are arrows labeled with their name, and with "if {condition}" when they have a condition.
- The panel: the settings of the selected state or transition. With nothing selected, it explains how to use the chart.
A new State property starts with a valid lifecycle: New (initial) and Done (final), joined by the transition Complete.
Working With the Chart
| To | Do this |
|---|---|
| Add a state | Click Add State. The new state is selected with its name ready to type over. |
| Add a transition | Drag the dot on a state's right edge to another state. The transition is named "Move to {state}" and selected. To add one with the keyboard, select a state and pick a target in Add a transition to. |
| Add a transition back to the same state | Drag the dot out of the state and back onto it, or pick "{state} (itself)" in Add a transition to. |
| Move a state | Drag it. |
| Select a state or transition | Click it, or press Tab to reach it and press Enter. |
| Remove a state or transition | Select it and press Delete or Backspace, or use Remove state or Remove transition in the panel. Removing a state removes its transitions. There's no confirmation, because nothing is stored until you save the entity. |
| Zoom | Use Zoom in, Zoom out and Fit the whole chart in the corner, or Ctrl + scroll. The zoom goes from 25% to 400% of the fitted chart. |
| Move around | Drag the background. |
States
Click a state to edit it in the panel.
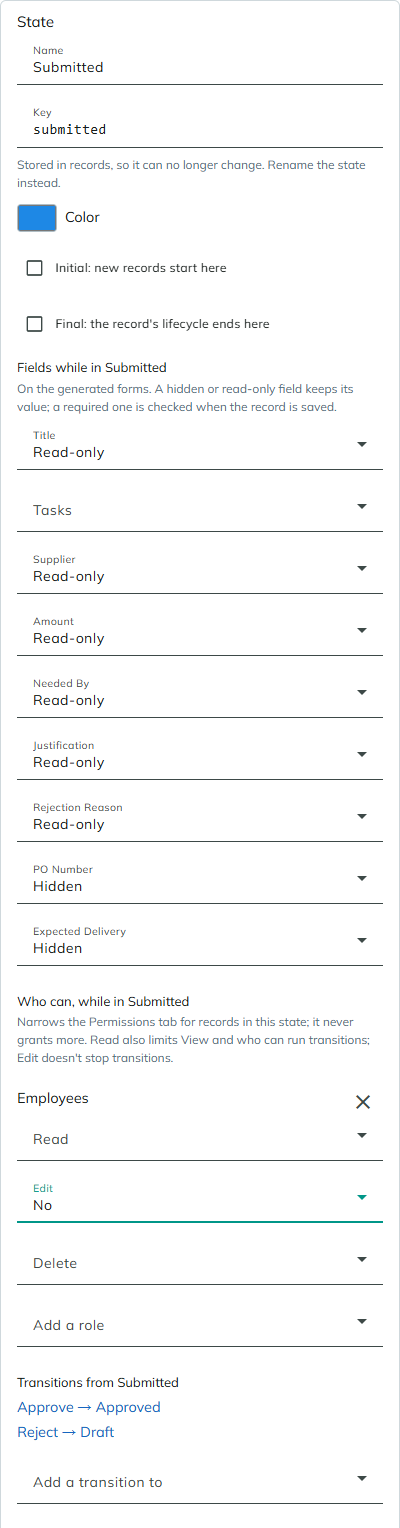
| Setting | Description |
|---|---|
| Name | What people see, for example on the badge and the buttons. You can rename a state at any time. |
| Key | What's stored in the record's State property. It's derived from the name while the state is new, for example Submitted, and you can change it until the lifecycle is saved. After that it's read-only: rename the state instead. |
| Color | The color of the state on the chart, the badge and the history. |
| Initial: new records start here | Exactly one state is initial. Checking it on another state moves it there. |
| Final: the record's lifecycle ends here | Marks the end of the lifecycle. A final state can still have transitions out of it if you draw them. |
| Fields while in {state} | The field rules of the state. |
| Who can, while in {state} | The permissions by state. |
| Transitions from {state} | Links to the transitions that leave the state. |
| Add a transition to | Adds a transition from this state to the state you pick. |
When the site's license includes Built-in Tasks, a state and a transition also have checklist settings. See Checklists on Lifecycle States.
Field Rules
Fields while in {state} has one setting per property of the entity, except State properties:
| Rule | On the generated pages | When a record is saved |
|---|---|---|
| As on any form | The property's own settings apply. | The property's own settings apply. |
| Required | No change to the form. | A save that leaves the field empty is refused with "{Property} is required while the {Entity} is {State}." |
| Read-only | The field is disabled on the Add and Edit forms. | A new value is ignored and the field keeps its value. |
| Hidden | The field isn't shown on the Add and Edit forms or on the detail view. | A new value is ignored and the field keeps its value. |
The rules of the record's current state apply. A new record is in the initial state, so the initial state's rules apply on the Add form; when a record is created, it takes the values it's given, and only Required is checked. A transition supplies its own required fields, so the field rules don't apply to the values a transition saves.
The rules are added to the fields' show and enable conditions on the generated forms. A condition you add to a field yourself is kept.
Permissions by State
Permissions by state are part of the Enterprise plan (Lifecycle.Permissions). Without it, the section shows a lock, and permissions saved earlier are kept but do nothing.
Under Who can, while in {state}, pick a role in Add a role, then set Read, Edit and Delete:
| Value | Meaning while a record is in this state |
|---|---|
| As on the Permissions tab | The role's permission on the entity's Permissions tab applies. |
| Own records only | The role keeps the permission only for its own records: those the user owns, or created, on an entity without record owners. |
| No | The role loses the permission for records in this state. |
For example, to let employees read only their own drafts, add Employees to Draft and set Read to Own records only.
The rules:
- A state never grants more than the Permissions tab. It only narrows it.
- Read also limits View, so a record a role may not read in its state doesn't show on the entity's pages, and Read also limits who can run transitions, because running one starts by reading the record.
- Edit doesn't stop transitions. A transition that names no roles asks the Permissions tab's Can Edit, so locking a state for editing doesn't stop records from leaving it. See Who May Run a Transition.
- The widest permission wins across a user's roles, as on the Permissions tab. A role that no state narrows keeps every record it has.
- They apply wherever records are read, listed, saved or deleted, whatever the source: pages, grids, workflows, data sources and the API. A refused save or delete gives the usual permission error.
- The generated Edit and Delete buttons and site search follow the Permissions tab only. A button can show where the state then refuses the save or delete, and a record a state hides can still appear in search results.
- Superusers are never narrowed.
- There's no Add setting. New records always start in the initial state, so the Permissions tab's Can Add decides.
- With several State properties, a record must pass the permissions of each lifecycle.
Transitions
Click a transition to edit it in the panel.
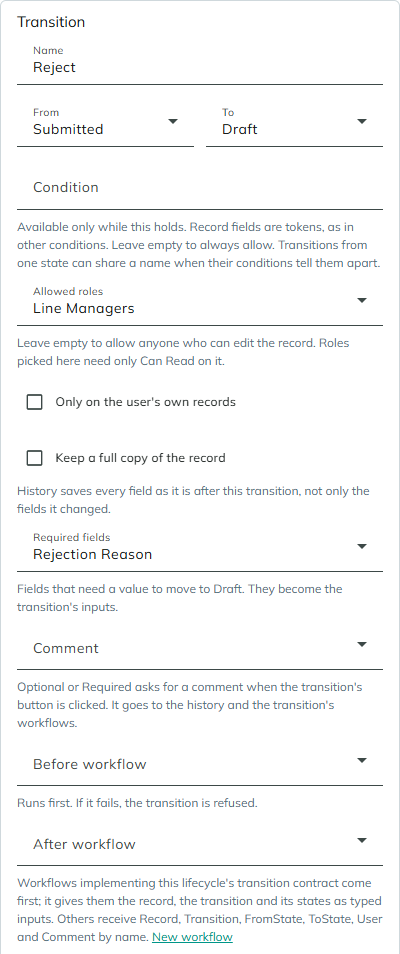
| Setting | Description |
|---|---|
| Name | The name of the button and the action, for example Approve. Required. |
| From, To | The state the transition starts from and the state it leads to. |
| Condition | The transition is available only while this holds. Write it like other conditions, with tokens. The record's fields are tokens named by their identifiers, for example [Amount] < 5000, and the user tokens work too. Leave it empty to always allow it. |
| Allowed roles | The roles that may run the transition. They need only Can Read on the record, not Can Edit. Leave it empty to allow anyone who can edit the record. |
| Only on the user's own records | Only the record's owner may run it, or its creator on an entity without record owners. |
| Keep a full copy of the record | Shown while Record History records this State property. The history entry keeps every field as it is after the transition. |
| Required fields | Fields that need a value to move to the target state. They become the transition's inputs: the popup, the action and the API ask for them, and they're saved with the new state. |
| Comment | None, Optional or Required. Optional or Required opens a popup with a Comment box when the button is clicked. See Comments. |
| Before workflow | Runs before the transition is saved. If it fails, the transition is refused. |
| After workflow | Runs after the transition is saved. |
For the workflows, see Before and After Workflows.
Conditions
A condition is checked against the record as it is before the transition, both for the buttons and on the server. So a value typed in the transition's popup can't decide whether the transition is available. A condition isn't a permission: it applies to superusers too.
Every transition whose condition holds is available. Two transitions from the same state can share a name only when each has a condition, so that at most one of them is available at a time. The Threshold Approval template uses this: its two Approve transitions from Submitted have the conditions [Amount] < 5000 and [Amount] >= 5000 (with your property and threshold), and lead to different states.
Transition Names
- Two transitions from the same state need different names, unless each has a condition.
- Two transitions between the same two states always need different names, conditions or not, so their actions and buttons can be told apart.
Names are compared without case and surrounding spaces. The panel shows the problem under Name while you type.
Saving and Validation
The lifecycle is saved by the entity editor's save button, right after the entity. If it has a problem, the entity is still saved, but the editor stays on the Lifecycle tab and shows The lifecycle was not saved. with the list of problems. The problems also show in the editor's error list, as "Lifecycle: {State property} Error: {problem}".
These warnings show above the chart but don't stop you saving:
- "No state is final yet. Mark the states where a record's lifecycle ends as final, unless it never ends."
- "No transition leads to {states} yet, so records can never reach it."
- "No transition leaves {states}, and it is not final, so records there can never move on."
These problems stop the lifecycle being saved:
| Message | What to do |
|---|---|
| Add at least one state. | Add a state. |
| Every state needs a name. | Name the state. |
| Two states use the key {key}. | Change one of the keys. |
| Mark exactly one state as initial. | Check Initial on one state. |
| Every transition needs a name. | Name the transition. |
| Two transitions from {state} are named {name}. Give each a condition, so that only one of them is available at a time. | Add conditions, or rename one. |
| Two transitions from {from} to {to} are named {name}. Give them different names, so their actions and buttons can be told apart. | Rename one. |
| {count} {Entity or Entities} are in {state}. Move them to another state before removing it. | You removed a state that records are in. Move the records first, for example with a transition, or keep the state. |
| The Before workflow of {transition} was not found. | The workflow was deleted. Pick another one. |
| The After workflow of {transition} was not found. | The workflow was deleted. Pick another one. |
With several State properties, each message starts with the property's name.
When a lifecycle is saved:
- Records that have no state yet are moved to the initial state.
- The generated detail and list pages get their badge, buttons and popups, and the entity's transition actions and API method are rebuilt.
- The lifecycle's transition contract is created or updated.
Considerations
- Removing the State property removes its lifecycle and its contract when the entity is saved with Merge Changes. Its history entries stay.
- Renaming a state or a transition changes no data. Records store the state's key, and history entries keep the transition's name as it was.
- Removing a transition removes its buttons, its popup forms and its action. Workflows that use the action need another one.
- If every role a transition names is deleted, its buttons show to no one and only superusers can run it.
Revised 11/12/2026